Verry Berry Cake
The Prescott monthly birthday cake tradition continues!
I've told you about the Orange Dream cake I made in January. Then February was my birthday month, and the president of our company would not let me make my own cake. So she made the most amazing cheesecakes (a chocolate one and my favorite: one with a lemon curd topping. Which reminds me, I need to get her recipe...)
March was up next! And I decided to tackle a really beautiful cake I had on Martha Stewart's show: a Berry Layer Cake.
Surely I could manage to make something similar, right?

Turns out that YES! I could make something similar.
One thing you'll notice is that my frosting isn't nearly as deep and dark colored as Martha's. Well, I don't know what kind of sorcery they pulled over there in TV land, but there's no way I would get my frosting that dark and purple without an obscene amount of food coloring. And any food coloring with red always tastes *very* bitter to me (one reason I almost never enjoy red velvet cake), so it wasn't worth it for me to try to replicate her colors.

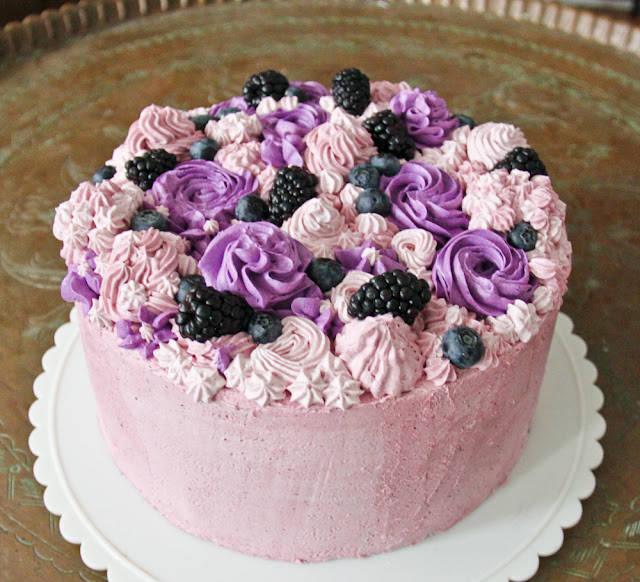
The medium pink color you see is all natural, made by adding a jar of black raspberry jam to my Swiss meringue buttercream. (The lighter pink was simply that pink frosting mixed with the regular white frosting). I did add some burgundy and purple food coloring to achieve the deeper purple color, but to avoid any bitterness I stopped after I got it just dark enough.
You can see the pretty frosting colors best in this photo. (I was so nervous because I didn't really have a set plan for the decorations, and I was just about to start piping all the pretty decorations at top!)

In the end I absolutely *love* how everything came together. The colors! The piping! The berries! One of my most favorite cakes that I've made.
So happy I invested the whopping $1 in a new extra large piping tip! (I wanted to order the Ateco 869 but ended up just grabbing the Wilton #8B tip at Michaels because I needed it quickly. I'd recommend Ateco tips more though.)

I wish I had a better picture of the inside of the cake, because it was sooo beautiful, but here's the very crappy cell phone pic.

The dark purple layers are actually the blueberries that were added to the cake batter.

I dusted them in flour in an attempt to keep them from settling at the bottom of the cake layers, but they just sunk right down anyways. It ended up being a happy mistake though, as I felt the dark berries right above the pink-ish frosting made for really gorgeous layers!
So if you make this cake, fear not if the bottom of your cake looks like this:

Just make sure to use parchment paper so you have no problems with sticking. Bonus: you can take some really artsy photos of the blueberry-stained parchment.

Another thing that I love about this cake is that you cook the 3 layers separately so you don't have to do any cake cutting/splitting the baked layers. And they really bake up so nicely!


Yours in making berry beautiful cakes,
Jacqueline
Verry Berry Cake, cake adapted from Martha Stewart and frosting from Stella Parks (of Serious Eats)
For the frosting I used Stella Park's buttercream recipe with Martha's idea for adding in a small jar of black raspberry jam. This does make the frosting a bit sweeter and while it's delicious, the fruit flavor is a bit mild. If you wanted more in-your-face flavor, Stella has an alternative suggestion, which is to use freeze-dried fruit to create a powder that you add to your buttercream. I haven't tried this yet, but I'm including the link here for you (and me) if you're interested! Finally, see below for some buttercream troubleshooting tips if you're having any issues.
When I made this cake I doubled the frosting recipe below, but I had a ton of frosting left over. But if you like extra frosting or want to make sure you have enough for all the decorations on top, I would recommend making up to 1.5X the recipe below (you can do it all at once without a problem). For a normal cake the recipe below is plenty, but with decorations and buttercream of various shades a bit extra wouldn't hurt.
Ingredients
Cake
2 sticks (1 cup) unsalted butter, room temperature, cut into tablespoons, plus more for pan
1 1/4 cups whole milk
3 cups cake flour (not self-rising), plus more for pans
4 large eggs, room temperature
1 vanilla bean, seeds scraped (2 tsp vanilla extract)
15 ounces blueberries (about 2 ½ cups)
1 tsp cornstarch
1 3/4 cups sugar
1 TBSP baking powder
1 tsp kosher salt
Swiss Meringue Buttercream - Black Raspberry (see note about making up to 1.5 batches)
6 ounces egg whites (2/3 cup; 170g), from 5 to 6 large eggs
11 ounces plain or lightly toasted sugar (about 1 2/3 cups; 310g)
3/4 teaspoon (3 g) Diamond Crystal kosher salt; use half as much if using table salt
1/4 teaspoon cream of tartar
20 ounces unsalted butter (5 sticks; 565g), softened to about 65°F (18°C)
1 tsp (5 ml) vanilla extract
1/4 tsp almond extract (optional; I did not use it)
1/2 cup black raspberry jam
Burgundy or purple gel food color
Assembly
Blueberries, black raspberries, blackberries, or any other kind of berries you like
Directions
Cake Directions
Buttercream Directions
Assembly
Buttercream Troubleshooting

I've told you about the Orange Dream cake I made in January. Then February was my birthday month, and the president of our company would not let me make my own cake. So she made the most amazing cheesecakes (a chocolate one and my favorite: one with a lemon curd topping. Which reminds me, I need to get her recipe...)
March was up next! And I decided to tackle a really beautiful cake I had on Martha Stewart's show: a Berry Layer Cake.
 |
| The inspiration cake! |
Surely I could manage to make something similar, right?

Turns out that YES! I could make something similar.
One thing you'll notice is that my frosting isn't nearly as deep and dark colored as Martha's. Well, I don't know what kind of sorcery they pulled over there in TV land, but there's no way I would get my frosting that dark and purple without an obscene amount of food coloring. And any food coloring with red always tastes *very* bitter to me (one reason I almost never enjoy red velvet cake), so it wasn't worth it for me to try to replicate her colors.

The medium pink color you see is all natural, made by adding a jar of black raspberry jam to my Swiss meringue buttercream. (The lighter pink was simply that pink frosting mixed with the regular white frosting). I did add some burgundy and purple food coloring to achieve the deeper purple color, but to avoid any bitterness I stopped after I got it just dark enough.
You can see the pretty frosting colors best in this photo. (I was so nervous because I didn't really have a set plan for the decorations, and I was just about to start piping all the pretty decorations at top!)

In the end I absolutely *love* how everything came together. The colors! The piping! The berries! One of my most favorite cakes that I've made.
So happy I invested the whopping $1 in a new extra large piping tip! (I wanted to order the Ateco 869 but ended up just grabbing the Wilton #8B tip at Michaels because I needed it quickly. I'd recommend Ateco tips more though.)


The dark purple layers are actually the blueberries that were added to the cake batter.

I dusted them in flour in an attempt to keep them from settling at the bottom of the cake layers, but they just sunk right down anyways. It ended up being a happy mistake though, as I felt the dark berries right above the pink-ish frosting made for really gorgeous layers!
So if you make this cake, fear not if the bottom of your cake looks like this:

Just make sure to use parchment paper so you have no problems with sticking. Bonus: you can take some really artsy photos of the blueberry-stained parchment.

Another thing that I love about this cake is that you cook the 3 layers separately so you don't have to do any cake cutting/splitting the baked layers. And they really bake up so nicely!

Yours in making berry beautiful cakes,
Jacqueline
Verry Berry Cake, cake adapted from Martha Stewart and frosting from Stella Parks (of Serious Eats)
For the frosting I used Stella Park's buttercream recipe with Martha's idea for adding in a small jar of black raspberry jam. This does make the frosting a bit sweeter and while it's delicious, the fruit flavor is a bit mild. If you wanted more in-your-face flavor, Stella has an alternative suggestion, which is to use freeze-dried fruit to create a powder that you add to your buttercream. I haven't tried this yet, but I'm including the link here for you (and me) if you're interested! Finally, see below for some buttercream troubleshooting tips if you're having any issues.
When I made this cake I doubled the frosting recipe below, but I had a ton of frosting left over. But if you like extra frosting or want to make sure you have enough for all the decorations on top, I would recommend making up to 1.5X the recipe below (you can do it all at once without a problem). For a normal cake the recipe below is plenty, but with decorations and buttercream of various shades a bit extra wouldn't hurt.
Ingredients
Cake
2 sticks (1 cup) unsalted butter, room temperature, cut into tablespoons, plus more for pan
1 1/4 cups whole milk
3 cups cake flour (not self-rising), plus more for pans
4 large eggs, room temperature
1 vanilla bean, seeds scraped (2 tsp vanilla extract)
15 ounces blueberries (about 2 ½ cups)
1 tsp cornstarch
1 3/4 cups sugar
1 TBSP baking powder
1 tsp kosher salt
Swiss Meringue Buttercream - Black Raspberry (see note about making up to 1.5 batches)
6 ounces egg whites (2/3 cup; 170g), from 5 to 6 large eggs
11 ounces plain or lightly toasted sugar (about 1 2/3 cups; 310g)
3/4 teaspoon (3 g) Diamond Crystal kosher salt; use half as much if using table salt
1/4 teaspoon cream of tartar
20 ounces unsalted butter (5 sticks; 565g), softened to about 65°F (18°C)
1 tsp (5 ml) vanilla extract
1/4 tsp almond extract (optional; I did not use it)
1/2 cup black raspberry jam
Burgundy or purple gel food color
Assembly
Blueberries, black raspberries, blackberries, or any other kind of berries you like
Directions
Cake Directions
- Preheat oven to 350 degrees.
- Butter three 10-inch or 9-inch round cake pans (I used 9"). Spray with baking spray (the kind with flour in it), line with parchment paper, and spray again. (If you don't have baking spray, butter the parchment, then dust with flour, tapping out excess.)
- Whisk together milk, eggs, and vanilla seeds. In a separate bowl, toss together blueberries and cornstarch.
- In the bowl of a mixer fitted with the paddle attachment, beat together flour, sugar, baking powder, and salt on low speed until well combined. Continue beating while gradually adding butter until mixture is crumbly, about 3 minutes.
- Slowly add half of milk mixture; increase speed to medium and beat until fluffy, about 2 minutes. Slowly add remaining half of milk mixture, scraping down bowl as needed. Beat until incorporated, about 1 minute more. Remove bowl from mixer; fold in blueberries.
- Divide batter evenly between prepared pans, spreading to edges with a small offset spatula. Tap pans on counter to release any air bubbles.
- Bake, rotating pans halfway through, until a tester inserted in centers comes out clean and tops are lightly golden, about 30 minutes (maybe a bit longer if you're using the 9" pans).
- Transfer pans to a wire rack; let cool completely. Turn cakes out of pans and remove parchment.
Buttercream Directions
- Fill a wide pot with at least 1 ½ inches of water, with a thick ring of crumpled tinfoil placed on the bottom to act as a "booster seat" that will prevent the bowl from touching the bottom of the pot. Place over high heat until steaming-hot, then adjust temperature to maintain a gentle simmer.
- Combine egg whites, sugar, salt, and cream of tartar in a heat-safe bowl. Set over steaming water, stirring and scraping constantly with a flexible spatula, until egg whites reach 175°F to 185°F (85°C). This should take only 10 to 12 minutes, so if mixture seems to be moving slowly, simply turn up the heat.
- Once ready, transfer mixture to a the bowl of a stand mixer, and with a whisk attachment whip at high speed about 10 minutes, until meringue is glossy, stiff, and cool to the touch, around 90°F (32°C). (Note: This may take 10 to 20+ minutes. One reason may be the direction to cook the egg whites in step 2 until they are 185°F. Typically Swiss meringue frosting is cooked to about 160°F, but Stella Park has a reason for her higher temperature; see here. In the end everything came out absolutely delicious, but I did want to warn that this may take longer to hit 90°F.)
- With mixer still running, add butter, 1 or 2 tablespoons at a time. Initially, the volume of the meringue will decrease dramatically; it may even seem soupy along the way, but as the cool butter is added, the mixture will begin to thicken and cool. In the end, buttercream should be thick, creamy, and soft but not runny, around 72°F (22°C). Mix in vanilla extract and almond extract (if using) on low speed until well combined.
- Switch to paddle attachment. Beat on low speed until air bubbles are eliminated, 3 to 5 minutes.
- Remove 2 cups of buttercream and set aside (reserve for decoration).
- Fold jam into the remaining large bowl of buttercream (I'll call this the berry buttercream).
Assembly
- Place a cake layer, bottom-side down, on a cake stand or serving platter.
- Spread about 1 ½cups of berry buttercream over it.
- Top with a second cake layer, bottom-side down, and another 1 ½ cups of berry buttercream.
- Finish with a third cake layer, bottom-side up. Evenly spread top and sides of cake with a 1/2-inch thickness of berry buttercream, smoothing with an offset spatula.
- Divide remaining buttercream among three bowls. Keep one bowl as it is (for your medium shade "berry buttercream"), lighten one bowl with some (or all) of the reserved buttercream (for a light pink hue), and add a bit of burgundy/red food coloring to the third bowl to darken it a bit (for your dark pink buttercream).
- Transfer to pastry bags fitted with open and closed star tips in a variety of sizes. Pipe swirls and rosettes of buttercream on top of cake.
- Decorate with a few fresh blueberries and blackberries.
- Frosted cake can be refrigerated overnight; bring to room temperature before serving. Serve with some additional fresh fruit.
Buttercream Troubleshooting
- If warmer than 74°F (23°C), the buttercream will be soft and loose; pop it in the fridge for 15 minutes and re-whip to help it thicken and cool.
- If colder than 68°F (20°C), the buttercream will be firm and dense, making it difficult to spread over cakes and slow to melt on the tongue, creating a greasy mouthfeel; to warm, briefly set over a pan of steaming water, just until you see the edges melting slightly, then re-whip to help it soften and warm.


Comments
Post a Comment