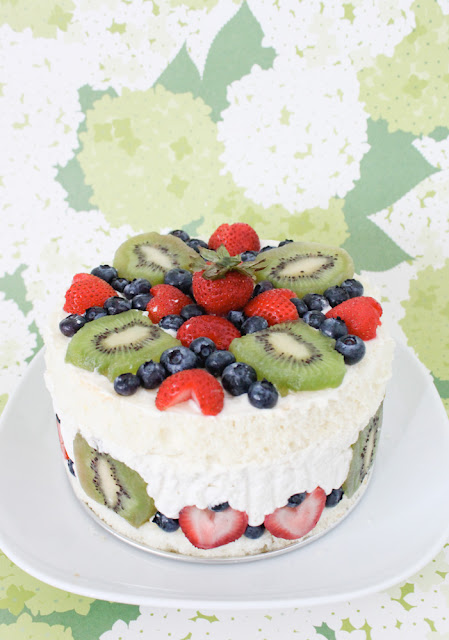
Lemon chiffon cake with fruit and lavender cream
Being the 27th of the month, it's time again for the big Daring Bakers reveal:
Jana of Cherry Tea Cakes was our July Daring Bakers’ host and she challenged us to make Fresh Frasiers inspired by recipes written by Elisabeth M. Prueitt and Chad Robertson in the beautiful cookbook Tartine.
The basic components were a chiffon cake + fruit + pastry cream (+ a thin layer of marzipan, which I didn't use...) Perfect cake for the crazy warm summer days we've been having here in Chicago!
Fueling my obsession with lavender (remember my lavender ice cream, lavender crostada and lavender Amish bread??) I decided to make a lemon chiffon cake with a lavender pastry cream filling.

So how did it taste?? Absolutely heavenly. The cake and filling were light & airy, not-too-sweet and literally just melted in your mouth. And the sweet tartness of the fruit was a perfect balance to the creaminess of the filling. Great cake for adults who aren't a fan of overly sweet cakes and frostings.
But lest you think this cake is for adults only I can promise you that people of all ages will enjoy every bite. Just check out how happy this little guy is!

In addition to making all the components from scratch (always a part of the Daring Bakers challenges), presentation of this cake is key. The fruit are not only part of the flavor, they're part of the aesthetics!!

The trick is using a springform pan in the assembly. I have crappy ones that I don't trust for baking, but they're perfect for assembling desserts like this. But if you don't have a springform pan, a homemade "ring" using some kind of posterboard should work as well.
Want to see how to put the whole thing together??
First you'll need to prep all your components (recipes below)


Step 3: Admire your work.

Step 4: Add almost half of your pastry cream filling to the cake (being careful not to displace or knock the fruit over from the edges).

Step 5: Add chopped fruit on top of the frosting, making sure to stay away from the edges.
This looked like a lot of fruit, but I could have added even more...

Step 6: Add remaining pastry cream filling, reserving ~1/4- 1/3 cup for the top. Gently place second layer of cake on top and brush with simple syrup.
Step 7: Use the rest of the pastry cream on top of the cake and decorate with fruit.
As you can tell, I like symmetry and order.

Step 8: Chill in the fridge for at least 4 hours.
Step 9: Get nervous as you approach the "moment of truth" (i.e. Will it work?!? Or will it be a complete and utter disaster?!)
Remove edges of springform pan and carefully peel away the parchment paper.

I let mine chill in the fridge overnight, and I'm glad I did. I mean check out how beautifully it sliced, even with that hefty amount of pastry cream filling!

Not sure what else to say about this dessert other than I loved it and I'm pretty sure you will too. It takes a little bit of time making the different components, but if you're more interested in flavor and not beauty you don't have to worry about doing the whole springform pan bit with the fruit around the edges. Just throw some filling onto a cake with some sliced fruit and top with another slice of cake.
Meticulously put together or rustically thrown together is your choice; either way your friends will love you.
Yours in making friends happy by making them fat,
Jacqueline
Want the recipes for this cake?? Click on the "Read More" below.
FYI: I made a lemon chiffon cake today, but I've provided variations in making your own lemon, orange, coconut or chocolate chiffon cake. Chocolate chiffon cake?!? Oh man, I think I may need to make that ASAP...
Basic Chiffon Cake, from The Daring Bakers
Note: Variations on this basic cake are listed below. I made the lemon chiffon cake. YUM!!
Also, the recipe calls for an 8" springform pan. If you don't have one, split the batter between two 8" or 9" pans (with 2" sides). It won't fit in a single 8" pan.
Ingredients
1 cup + 2 tablespoons (270 ml) (5½ oz/155 gm) all-purpose flour
1 teaspoon (5 ml) (4 gm) baking powder
3/4 cups (180 ml) (6 oz /165 gm) sugar, divided
1/2 teaspoon (2½ ml) (1½ gm) salt, preferably kosher
1/4 cup (2 fl oz/60 ml) vegetable oil
3 large egg yolks
⅓ cup + 1 tablespoon (3.17 fl oz/95 ml) water
1 teaspoon (5 ml) pure vanilla extract
3/4 teaspoon (3¾ ml) (3 gm) lemon zest, grated
5 large egg whites
¼ teaspoon (1¼ ml) (1 gm) cream of tartar
Directions
1. Preheat the oven to moderate 325°F (160°C/gas mark 3).
2. Line the bottom of an 8-inch (20 cm) spring form pan with parchment paper. Do not grease the
sides of the pan. (Use two 8" or 9" pans if you don't have a spring form pan.)
3. In a large mixing bowl, stir together the flour and baking powder. Add in all but 3 tablespoons (45
ml.) of sugar, and all of the salt. Stir to combine.
4. In a small bowl combine the oil, egg yolks, water, vanilla and lemon zest. Whisk thoroughly.
5. Combine with the dry ingredients and mix thoroughly (by hand) for about one minute, or until very smooth.
6. Put the egg whites into a stand mixer, and beat on medium speed using a whisk attachment on a
medium speed, until frothy. Add cream of tartar and beat on a medium speed until the whites hold
soft peaks. Slowly add the remaining sugar and beat on a medium-high speed until the whites hold
firm and form shiny peaks.
7. Using a grease free rubber spatula, scoop about ⅓ of the whites into the yolk mixture and fold in
gently. Gently fold in the remaining whites just until combined.
8. Pour the batter into the prepared pan(s). Bake for 45 to 55 minutes or until toothpick inserted into the center comes out clean. (See note below)
9. Removed the cake from the oven and allow to cool completely in the pan on a wire rack. (See note below)
10. To unmold, run a knife around the sides to loosen the cake from the pan and remove the spring form sides. Invert the cake and peel off the parchment paper. Refrigerate for up to four days.
Note: My cake looked perfect when it came out of the oven (lightly golden brown, perfectly flat top) but after it cooled it sank in the middle. After asking why this happened I was given two reasons:
1. I needed to cook my cake for a minute or two longer, even though the toothpick came out pretty clean. If the cake is evenly slightly underdone it has a tendency to fall. So unlike most cakes, err on the side of slightly overcooking it. (And since you'll be moistening it with a simple syrup, it's ok if it's slightly drier.)
2. I should have cooled my cake upside down (similar to an angel food cake). This prevents gravity from taking over and making the cake fall.
Variations to the Basic Chiffon Cake
Lemon Chiffon Cake
Ingredient Alterations
Reduce water to 1/4 cup (60 ml)
Add 1/8 cup (30 ml) lemon juice
Increase lemon zest to 1½ teaspoon (7½ ml) (5 gm)
Remove the vanilla from the recipe
Direction Alterations
Follow the directions, same as above, adding the lemon juice and zest to the oil, egg yolks and water in step 4.
Orange Chiffon Cake
Ingredient Alterations
Replace the full amount of water with orange juice
Replace lemon zest with the zest of one orange
Remove the vanilla from the recipe
Direction Alterations
Follow the directions, same as above, adding the orange juice and zest to the oil, and egg yolks in step 4.
Coconut Chiffon Cake
Ingredient Alterations
Add ¼ teaspoon (1¼ ml) (1 gm) freshly ground nutmeg
Reduce oil to 1/8 cup (1 fl oz/30ml)
Reduce water to 1/8 cup (1 fl oz/30ml)
Add 1/3 cup (2 ⅔ fl oz/80 ml) unsweetened coconut milk
Remove the vanilla from the recipe
Direction Alterations
Follow the directions, same as above, adding the nutmeg to the flour mixture in step 3, and the coconut milk to the oil, water and egg yolks in step 4.
Chocolate Chiffon Cake
Ingredient Alterations
Reduce all-purpose flour to ¾ cup + 1 tablespoon (195 ml) (4 oz/110 g)
Add 1/4 cup (60 ml) (3/4 oz/20 g) cocoa powder
Direction Alterations
Follow the directions, same as above, adding the cocoa to the flour mixture in step 3
(Lavender) Pastry Cream Filling, slightly modified from The Daring Bakers
Note: The addition of gelatin makes this different from other pastry cream recipes (like the kind I used in my cream puffs). The reason is so that the cream "sets" and can be sliced. You can eliminate the gelatin step but if you do that I'd suggest going the "rustic" route with your dessert as it'll likely ooze out the sides.
Also, I increased the milk and cream amounts from the original recipe for a bit more cream filling. Use only 1 cup milk and 1 cup heavy cream if you don't want quite so much cream filling in your cake.
Ingredients
1 1/2 cups (12 fl oz/375 ml) whole milk
1/2 teaspoon (2½ ml) pure vanilla extract
1-2 TBSP dried lavender flowers, optional
1/8 teaspoon (1/2 ml) (¼ gm) salt, preferably kosher
2 tablespoons (30 ml) (15 gm) cornstarch
1/4 cup (60 ml) (2 oz/55 gm) sugar
1 large egg + 1 yolk (extra yolk is optional, but I decided to add it as it was leftover from the cake)
2 tablespoons (30 ml) (1 oz/30 gm) unsalted butter
1 teaspoon (5.3 gm) gelatin
1 TBSP water
1 1/2 cups (12 fl oz/375 ml) heavy cream
Directions
1. Pour the milk, vanilla, lavender, and salt into a heavy sauce pan. Bring to a near boil, turn off heat, and let steep for 15-30 minutes (or until the lavender flavor is to your liking. Skip this step if you don't like lavender). Reheat over medium heat and scald, bringing it to a near boiling point. Stir occasionally.
2. Meanwhile, in a medium sized bowl mix the cornstarch and sugar. Whisk to combine.
3. Add the eggs to the sugar and cornstarch and whisk until smooth.
4. When the milk is ready, gently and slowly pour the heated milk down the side of the bowl into the egg mixture, making sure to whisk constantly. (Make sure to add the milk particularly slowly at the beginning: you don't want scrambled eggs!)
5. Pour the mixture back into the warm pot and continue to cook over a medium heat until the custard
is thick, just about to boil and coats the back of a spoon. (Make sure you are constantly mixing the custard, as leaving it for even a minute can cause it to overcook and get lumpy.)
6. Remove from heat and pass through a fine mesh sieve into a large mixing bowl. Allow to cool for ten minutes, stirring occasionally.
7. Cut the butter into four pieces and whisk into the pastry cream a piece at a time until smooth.
8. Cover the cream with plastic wrap, pressing the plastic wrap onto the top of the cream to prevent a
skin from forming. Chill in the refrigerator for up to five days.
9. In a small dish, sprinkle the gelatin over the water and let stand for a few minutes to soften. Add a drop or two more water if the gelatin soaks it all up.
10. Put two inches (55 mm) of water into a small sauce pan and bring to a simmer over a medium heat.
11. Measure 1/4 cup (2 oz/60 ml) of the chilled pastry cream into a small stainless steel bowl that will sit on the sauce pan with the simmering water, without touching the water.
12. Heat the pastry cream until it is 120 F (48.8 C). (Note: This was such a small amount there was no way I could measure the temperature. So I just heated it up until it was liquidy and very warm to the touch.) Add the gelatin and whisk until smooth. Remove from the water bath, and whisk the remaining cold pastry cream in to incorporate in two batches.
13. In a stand mixer, fitted with the whisk attachment, whip the cream until it holds medium-stiff peaks. Immediately fold the whipped cream into the pastry cream with a rubber spatula.
Simple Syrup
Note: You may choose to flavor the syrup. One way is to use flavored sugar (for example: apple cider sugar, orange sugar, or vanilla sugar) or to stir in 1-2 teaspoons of flavored extract. You may also infuse with herbs or spices, if desired or add four tablespoons (60 ml) of fruit juice or liqueur while the syrup is cooling.
Ingredients
1/3 cup (2⅔ fl oz/80 ml) (2⅔ oz/75 gm) of sugar, flavored or white
1/3 cup (2⅔ fl oz/80 ml) of water
Directions
1. Combine the water and sugar in a medium saucepan.
2. Bring the mixture to a boil and let the sugar dissolve. Stirring is not necessary, but will not harm the syrup.
3. Remove the syrup from the heat and cool slightly.
4. Transfer syrup to a lidded container or jar that can be stored in the refrigerator. Simple syrup can be stored for up to one month.
Fraisier Assembly
Components
baked chiffon cake (thick cake sliced in half if baked in springform pan or two thinner cakes if baked in individual pans)
1 recipe pastry cream filling
⅓ cup (80 ml) simple syrup or flavored syrup
fruit (I used less than 1 lb of strawberries, half a pint of blueberries, and almost 2 kiwis)
½ cup (120 ml) (5 oz/140 gm) almond paste
-and/or-
additional fruit for decorating the top
Directions
1. Line the sides of a springform pan with plastic wrap or parchment paper. Do not line the bottom of the pan.
2. Fit the bottom layer into the prepared spring form pan. Moisten the layer evenly with the simple syrup. When the cake has absorbed enough syrup to resemble a squishy sponge, you have enough.
3. Hull and slice in half enough strawberries to arrange around the sides of the cake pan. Place the cut side of the strawberry against the sides of the pan, point side up forming a ring.
4. Pipe cream in-between strawberries and a thin layer across the top of the cake.
5. Hull and quarter your remaining strawberries and place them in the middle of the cake. Cover the strawberries and entirely with the all but some of the pastry cream.
6. Place the second cake layer on top and moisten with the simple syrup.
If not using almond paste, skip to step #8.
7. Lightly dust a work surface with confectioners' sugar and roll out the almond paste to a 10-inch (25
cm) round 1/16 inch (1.5 mm) thick. Spread the remaining 1 tablespoon (15 ml) of pastry cream on the top of the cake and cover with the round of almond paste. (Continue with step #8 or skip to #9)
8. Spread the remaining 1/4 to 1/3 cup pastry cream on the top of the cake and decorate with fruit.
9. Cover with plastic wrap and refrigerate for at least 4 hours.
10. To serve release the sides of the spring form pan and peel away the plastic wrap. Serve immediately or store in the refrigerator for up to 3 days.

Jana of Cherry Tea Cakes was our July Daring Bakers’ host and she challenged us to make Fresh Frasiers inspired by recipes written by Elisabeth M. Prueitt and Chad Robertson in the beautiful cookbook Tartine.
The basic components were a chiffon cake + fruit + pastry cream (+ a thin layer of marzipan, which I didn't use...) Perfect cake for the crazy warm summer days we've been having here in Chicago!
Fueling my obsession with lavender (remember my lavender ice cream, lavender crostada and lavender Amish bread??) I decided to make a lemon chiffon cake with a lavender pastry cream filling.

Surprised at how successful this challenge was!
But lest you think this cake is for adults only I can promise you that people of all ages will enjoy every bite. Just check out how happy this little guy is!

Obligatory shot of cute kid with frosting all over his face.

I heart strawberries.
And blueberries and cherries and kiwi and mango and nectarines and plums and peaches and apples and grapefruit and all kinds of freaking fruit. Except durian. I don't heart durian all that much.
The trick is using a springform pan in the assembly. I have crappy ones that I don't trust for baking, but they're perfect for assembling desserts like this. But if you don't have a springform pan, a homemade "ring" using some kind of posterboard should work as well.
Want to see how to put the whole thing together??
First you'll need to prep all your components (recipes below)

Step 1: Line springform pan with parchment paper.
Brush one layer of cake with simple syrup and insert in the bottom of the springform pan.

Step 2: Line the edges of the pan with sliced fruit (cut edges facing out).
Use some frosting to hold the fruit "up" if it's being a pain and not standing up on its own.

Step 3: Admire your work.

Step 4: Add almost half of your pastry cream filling to the cake (being careful not to displace or knock the fruit over from the edges).

Step 5: Add chopped fruit on top of the frosting, making sure to stay away from the edges.
This looked like a lot of fruit, but I could have added even more...

Step 6: Add remaining pastry cream filling, reserving ~1/4- 1/3 cup for the top. Gently place second layer of cake on top and brush with simple syrup.
(not pictured)
As you can tell, I like symmetry and order.

Step 8: Chill in the fridge for at least 4 hours.
(not pictured, as my fridge is not very exciting)
Step 9: Get nervous as you approach the "moment of truth" (i.e. Will it work?!? Or will it be a complete and utter disaster?!)
Remove edges of springform pan and carefully peel away the parchment paper.

SUCCESS!!!!!!! And it's quite perfect around the edges, if I say so myself.

Can you hear it calling your name?
Meticulously put together or rustically thrown together is your choice; either way your friends will love you.
Yours in making friends happy by making them fat,
Jacqueline
Want the recipes for this cake?? Click on the "Read More" below.
FYI: I made a lemon chiffon cake today, but I've provided variations in making your own lemon, orange, coconut or chocolate chiffon cake. Chocolate chiffon cake?!? Oh man, I think I may need to make that ASAP...
Basic Chiffon Cake, from The Daring Bakers
Note: Variations on this basic cake are listed below. I made the lemon chiffon cake. YUM!!
Also, the recipe calls for an 8" springform pan. If you don't have one, split the batter between two 8" or 9" pans (with 2" sides). It won't fit in a single 8" pan.
Ingredients
1 cup + 2 tablespoons (270 ml) (5½ oz/155 gm) all-purpose flour
1 teaspoon (5 ml) (4 gm) baking powder
3/4 cups (180 ml) (6 oz /165 gm) sugar, divided
1/2 teaspoon (2½ ml) (1½ gm) salt, preferably kosher
1/4 cup (2 fl oz/60 ml) vegetable oil
3 large egg yolks
⅓ cup + 1 tablespoon (3.17 fl oz/95 ml) water
1 teaspoon (5 ml) pure vanilla extract
3/4 teaspoon (3¾ ml) (3 gm) lemon zest, grated
5 large egg whites
¼ teaspoon (1¼ ml) (1 gm) cream of tartar
Directions
1. Preheat the oven to moderate 325°F (160°C/gas mark 3).
2. Line the bottom of an 8-inch (20 cm) spring form pan with parchment paper. Do not grease the
sides of the pan. (Use two 8" or 9" pans if you don't have a spring form pan.)
3. In a large mixing bowl, stir together the flour and baking powder. Add in all but 3 tablespoons (45
ml.) of sugar, and all of the salt. Stir to combine.
4. In a small bowl combine the oil, egg yolks, water, vanilla and lemon zest. Whisk thoroughly.
5. Combine with the dry ingredients and mix thoroughly (by hand) for about one minute, or until very smooth.
6. Put the egg whites into a stand mixer, and beat on medium speed using a whisk attachment on a
medium speed, until frothy. Add cream of tartar and beat on a medium speed until the whites hold
soft peaks. Slowly add the remaining sugar and beat on a medium-high speed until the whites hold
firm and form shiny peaks.
7. Using a grease free rubber spatula, scoop about ⅓ of the whites into the yolk mixture and fold in
gently. Gently fold in the remaining whites just until combined.
8. Pour the batter into the prepared pan(s). Bake for 45 to 55 minutes or until toothpick inserted into the center comes out clean. (See note below)
9. Removed the cake from the oven and allow to cool completely in the pan on a wire rack. (See note below)
10. To unmold, run a knife around the sides to loosen the cake from the pan and remove the spring form sides. Invert the cake and peel off the parchment paper. Refrigerate for up to four days.
Note: My cake looked perfect when it came out of the oven (lightly golden brown, perfectly flat top) but after it cooled it sank in the middle. After asking why this happened I was given two reasons:
1. I needed to cook my cake for a minute or two longer, even though the toothpick came out pretty clean. If the cake is evenly slightly underdone it has a tendency to fall. So unlike most cakes, err on the side of slightly overcooking it. (And since you'll be moistening it with a simple syrup, it's ok if it's slightly drier.)
2. I should have cooled my cake upside down (similar to an angel food cake). This prevents gravity from taking over and making the cake fall.
Variations to the Basic Chiffon Cake
Lemon Chiffon Cake
Ingredient Alterations
Reduce water to 1/4 cup (60 ml)
Add 1/8 cup (30 ml) lemon juice
Increase lemon zest to 1½ teaspoon (7½ ml) (5 gm)
Remove the vanilla from the recipe
Direction Alterations
Follow the directions, same as above, adding the lemon juice and zest to the oil, egg yolks and water in step 4.
Orange Chiffon Cake
Ingredient Alterations
Replace the full amount of water with orange juice
Replace lemon zest with the zest of one orange
Remove the vanilla from the recipe
Direction Alterations
Follow the directions, same as above, adding the orange juice and zest to the oil, and egg yolks in step 4.
Coconut Chiffon Cake
Ingredient Alterations
Add ¼ teaspoon (1¼ ml) (1 gm) freshly ground nutmeg
Reduce oil to 1/8 cup (1 fl oz/30ml)
Reduce water to 1/8 cup (1 fl oz/30ml)
Add 1/3 cup (2 ⅔ fl oz/80 ml) unsweetened coconut milk
Remove the vanilla from the recipe
Direction Alterations
Follow the directions, same as above, adding the nutmeg to the flour mixture in step 3, and the coconut milk to the oil, water and egg yolks in step 4.
Chocolate Chiffon Cake
Ingredient Alterations
Reduce all-purpose flour to ¾ cup + 1 tablespoon (195 ml) (4 oz/110 g)
Add 1/4 cup (60 ml) (3/4 oz/20 g) cocoa powder
Direction Alterations
Follow the directions, same as above, adding the cocoa to the flour mixture in step 3
(Lavender) Pastry Cream Filling, slightly modified from The Daring Bakers
Note: The addition of gelatin makes this different from other pastry cream recipes (like the kind I used in my cream puffs). The reason is so that the cream "sets" and can be sliced. You can eliminate the gelatin step but if you do that I'd suggest going the "rustic" route with your dessert as it'll likely ooze out the sides.
Also, I increased the milk and cream amounts from the original recipe for a bit more cream filling. Use only 1 cup milk and 1 cup heavy cream if you don't want quite so much cream filling in your cake.
Ingredients
1 1/2 cups (12 fl oz/375 ml) whole milk
1/2 teaspoon (2½ ml) pure vanilla extract
1-2 TBSP dried lavender flowers, optional
1/8 teaspoon (1/2 ml) (¼ gm) salt, preferably kosher
2 tablespoons (30 ml) (15 gm) cornstarch
1/4 cup (60 ml) (2 oz/55 gm) sugar
1 large egg + 1 yolk (extra yolk is optional, but I decided to add it as it was leftover from the cake)
2 tablespoons (30 ml) (1 oz/30 gm) unsalted butter
1 teaspoon (5.3 gm) gelatin
1 TBSP water
1 1/2 cups (12 fl oz/375 ml) heavy cream
Directions
1. Pour the milk, vanilla, lavender, and salt into a heavy sauce pan. Bring to a near boil, turn off heat, and let steep for 15-30 minutes (or until the lavender flavor is to your liking. Skip this step if you don't like lavender). Reheat over medium heat and scald, bringing it to a near boiling point. Stir occasionally.
2. Meanwhile, in a medium sized bowl mix the cornstarch and sugar. Whisk to combine.
3. Add the eggs to the sugar and cornstarch and whisk until smooth.
4. When the milk is ready, gently and slowly pour the heated milk down the side of the bowl into the egg mixture, making sure to whisk constantly. (Make sure to add the milk particularly slowly at the beginning: you don't want scrambled eggs!)
5. Pour the mixture back into the warm pot and continue to cook over a medium heat until the custard
is thick, just about to boil and coats the back of a spoon. (Make sure you are constantly mixing the custard, as leaving it for even a minute can cause it to overcook and get lumpy.)
6. Remove from heat and pass through a fine mesh sieve into a large mixing bowl. Allow to cool for ten minutes, stirring occasionally.
7. Cut the butter into four pieces and whisk into the pastry cream a piece at a time until smooth.
8. Cover the cream with plastic wrap, pressing the plastic wrap onto the top of the cream to prevent a
skin from forming. Chill in the refrigerator for up to five days.
9. In a small dish, sprinkle the gelatin over the water and let stand for a few minutes to soften. Add a drop or two more water if the gelatin soaks it all up.
10. Put two inches (55 mm) of water into a small sauce pan and bring to a simmer over a medium heat.
11. Measure 1/4 cup (2 oz/60 ml) of the chilled pastry cream into a small stainless steel bowl that will sit on the sauce pan with the simmering water, without touching the water.
12. Heat the pastry cream until it is 120 F (48.8 C). (Note: This was such a small amount there was no way I could measure the temperature. So I just heated it up until it was liquidy and very warm to the touch.) Add the gelatin and whisk until smooth. Remove from the water bath, and whisk the remaining cold pastry cream in to incorporate in two batches.
13. In a stand mixer, fitted with the whisk attachment, whip the cream until it holds medium-stiff peaks. Immediately fold the whipped cream into the pastry cream with a rubber spatula.
Simple Syrup
Note: You may choose to flavor the syrup. One way is to use flavored sugar (for example: apple cider sugar, orange sugar, or vanilla sugar) or to stir in 1-2 teaspoons of flavored extract. You may also infuse with herbs or spices, if desired or add four tablespoons (60 ml) of fruit juice or liqueur while the syrup is cooling.
Ingredients
1/3 cup (2⅔ fl oz/80 ml) (2⅔ oz/75 gm) of sugar, flavored or white
1/3 cup (2⅔ fl oz/80 ml) of water
Directions
1. Combine the water and sugar in a medium saucepan.
2. Bring the mixture to a boil and let the sugar dissolve. Stirring is not necessary, but will not harm the syrup.
3. Remove the syrup from the heat and cool slightly.
4. Transfer syrup to a lidded container or jar that can be stored in the refrigerator. Simple syrup can be stored for up to one month.
Fraisier Assembly
Components
baked chiffon cake (thick cake sliced in half if baked in springform pan or two thinner cakes if baked in individual pans)
1 recipe pastry cream filling
⅓ cup (80 ml) simple syrup or flavored syrup
fruit (I used less than 1 lb of strawberries, half a pint of blueberries, and almost 2 kiwis)
½ cup (120 ml) (5 oz/140 gm) almond paste
-and/or-
additional fruit for decorating the top
Directions
1. Line the sides of a springform pan with plastic wrap or parchment paper. Do not line the bottom of the pan.
2. Fit the bottom layer into the prepared spring form pan. Moisten the layer evenly with the simple syrup. When the cake has absorbed enough syrup to resemble a squishy sponge, you have enough.
3. Hull and slice in half enough strawberries to arrange around the sides of the cake pan. Place the cut side of the strawberry against the sides of the pan, point side up forming a ring.
4. Pipe cream in-between strawberries and a thin layer across the top of the cake.
5. Hull and quarter your remaining strawberries and place them in the middle of the cake. Cover the strawberries and entirely with the all but some of the pastry cream.
6. Place the second cake layer on top and moisten with the simple syrup.
If not using almond paste, skip to step #8.
7. Lightly dust a work surface with confectioners' sugar and roll out the almond paste to a 10-inch (25
cm) round 1/16 inch (1.5 mm) thick. Spread the remaining 1 tablespoon (15 ml) of pastry cream on the top of the cake and cover with the round of almond paste. (Continue with step #8 or skip to #9)
8. Spread the remaining 1/4 to 1/3 cup pastry cream on the top of the cake and decorate with fruit.
9. Cover with plastic wrap and refrigerate for at least 4 hours.
10. To serve release the sides of the spring form pan and peel away the plastic wrap. Serve immediately or store in the refrigerator for up to 3 days.


Beautiful! Like most of your recipes I don't have the skills or wherewithall to make it myself, but I can drool.
ReplyDeleteI was also nervous about the "moment of truth", but it worked out for me too! (And I also used lavender, in the cake rather than the cream.) Beautiful decoration on top - I like all the different coloured fruit.
ReplyDeleteI love the colors and the fruit arrangement on top of your cake!
ReplyDeleteI just made the lemon chiffon cake...it's cooling as we speak. Thanks for the recipe!
ReplyDeletewish me luck. i will post a picture once it is done1
ReplyDeleteMmm, lemon and lavender and heart-shaped fruits....Also, I didn't know you used to work in a dollar store!
ReplyDelete