Let there be internet... and organization
Sorry I've been out in the dark recently with the blog. My move to my own apartment during Labor Day weekend sucked the life out of me as I scrambled to unpack all 60 boxes of mine in a weekend. (Thanks to help from my mom, family, and movers- it was a success!) And then, when I was all settled and finally ready to start posting about painting furniture and ice cream and other goodies, a certain company (*cough* Comcast *cough*) made me wait a week before registering my modem.
A whole week without internet at home. Can you believe it?!? The madness!
But I have to admit, there were moments that I savored just how quiet and slow life was when I was at home without the distractions of the world wide web. I did crazy things this past week like read a book and eat at my dining room table and talk to friends.
I know, crazy shit!
Those moments were peaceful, but I'm ready to get back to my blog... and Hulu. (Misfits, oh how I've missed you...)
I have a food post in the works for you guys, since this is a food blog and all, but today I bring to you another crafting project that I completed before my big move: a DIY bracelet/necklace/earring/whatever you want organizer.

I don't know about you, but I like my jewelry to be (a) visible for easy browsing and (b) organized. This also goes for my rings (previous post), my pantry (post on that in the upcoming weeks), my underwear/sock drawer (sorry, I will not be posting pics on that one...), and just about everything else in my life.
And thanks to my old roommate, who taught me how to create such a functional piece of art, I now have a perfect solution to my jewelry conundrum:

These holders are basically just wooden frames, covered in tulle. Lightweight items can easily hang from the holes in the tulle fabric (e.g. earrings) and hooks can be added to the wooden frames to support heavier items (e.g. necklaces). For lightweight items that don't naturally hang on their own (e.g. pendants) I have a neat little tip below.
To start this project you'll need three simple things:
1. Wooden frames
Art stores have these awesome, mix-and-match wooden pieces called "stretcher bars" or "stretcher strips" that allow you to make almost any sized frame your heart desires. Basically, they're interlocking pieces of wood that come in sizes ranging from 8" to 60"(in 2" increments).

They're technically used to stretch canvas over them, but if you don't mind slight imperfections in your wooden frame (the pieces fit together well, but not seamlessly), they're a super cheap and awesome product that can be used for this project!
For example, at Blick the 8" pieces are $0.65 and the 16" pieces are $1.22. So it'll cost you a whopping $3.74 to make one 8 x 16" frame.
2. Tulle (pronounced "tool")
It's that fabric that they use to make tu-tus and underskirts for wedding dresses and poofy skirts. And it's dirt cheap. Between $1-$2 per yard. I purchased one yard for all four of my frames and still had a ton of fabric left over.

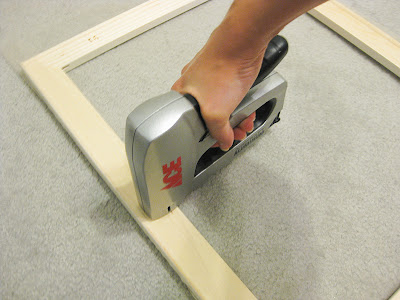
3. A staple gun
Because we have to counteract all this girlieness with power tools! Not that a staple gun is much of a power tool. But I still feel pretty bad-ass whenever I use it.
I can see if you don't want to spend $15- 20 on a tool you might only use one time. So you could probably use regular staples from a stapler (the wood on these stretchers is relatively soft) or some glue. But I've only done this with a staple gun, so I know that works. No matter what technique you end up using, just make sure your tulle is taught over the frame.
When you do it properly, you'll have a thin layer of tulle stretched over your wooden frame. (You could use two layers of tulle if you wanted more strength, but one works fine.)

At this point, your frame is done and ready for your jewelry! Hang earrings directly on the tulle or screw in small hooks to your frame to support heavier items.

But what about things that can't hang directly on the tulle or a hook, like pendants and the such?

4. Paper clips (optional)
Now I know paper clips sound crazy. But they totally work. Because you can hang them from the tulle and then hang whatever item you want on them. I made my holders from mini paper clips in 4 easy steps:

So there you have it. A cheap and unique way of displaying and organizing all your jewelry. Plus I find that I wear so much more of my jewelry since I find myself every morning staring at my frames and asking myself "what should I wear today?!?"
Don't you think it's time you asked yourself the same question??
Yours in functional wall art,
Jacqueline
A whole week without internet at home. Can you believe it?!? The madness!
But I have to admit, there were moments that I savored just how quiet and slow life was when I was at home without the distractions of the world wide web. I did crazy things this past week like read a book and eat at my dining room table and talk to friends.
I know, crazy shit!
Those moments were peaceful, but I'm ready to get back to my blog... and Hulu. (Misfits, oh how I've missed you...)
I have a food post in the works for you guys, since this is a food blog and all, but today I bring to you another crafting project that I completed before my big move: a DIY bracelet/necklace/earring/whatever you want organizer.

Pendants and earrings and necklaces and bracelets... oh my!
And thanks to my old roommate, who taught me how to create such a functional piece of art, I now have a perfect solution to my jewelry conundrum:

The wooden frames are 8" x 16" and 20" x 16" (two of each size)
And yes, I own four stuffed animals. Figured I should save
a few for my future, non existent children...
These holders are basically just wooden frames, covered in tulle. Lightweight items can easily hang from the holes in the tulle fabric (e.g. earrings) and hooks can be added to the wooden frames to support heavier items (e.g. necklaces). For lightweight items that don't naturally hang on their own (e.g. pendants) I have a neat little tip below.
To start this project you'll need three simple things:
1. Wooden frames
Art stores have these awesome, mix-and-match wooden pieces called "stretcher bars" or "stretcher strips" that allow you to make almost any sized frame your heart desires. Basically, they're interlocking pieces of wood that come in sizes ranging from 8" to 60"(in 2" increments).

Image from Toose Art Supplies
They're technically used to stretch canvas over them, but if you don't mind slight imperfections in your wooden frame (the pieces fit together well, but not seamlessly), they're a super cheap and awesome product that can be used for this project!
For example, at Blick the 8" pieces are $0.65 and the 16" pieces are $1.22. So it'll cost you a whopping $3.74 to make one 8 x 16" frame.
2. Tulle (pronounced "tool")
It's that fabric that they use to make tu-tus and underskirts for wedding dresses and poofy skirts. And it's dirt cheap. Between $1-$2 per yard. I purchased one yard for all four of my frames and still had a ton of fabric left over.

I feel pretty, oh so pretty. I feel pretty and witty and gaaaaay.
Because we have to counteract all this girlieness with power tools! Not that a staple gun is much of a power tool. But I still feel pretty bad-ass whenever I use it.
I can see if you don't want to spend $15- 20 on a tool you might only use one time. So you could probably use regular staples from a stapler (the wood on these stretchers is relatively soft) or some glue. But I've only done this with a staple gun, so I know that works. No matter what technique you end up using, just make sure your tulle is taught over the frame.

Always be careful when handling a staple gun. As my best friend says:
"It's fun and games until someone loses and eye"
When you do it properly, you'll have a thin layer of tulle stretched over your wooden frame. (You could use two layers of tulle if you wanted more strength, but one works fine.)

The tulle is almost invisible
At this point, your frame is done and ready for your jewelry! Hang earrings directly on the tulle or screw in small hooks to your frame to support heavier items.

I love how the earrings just seem to float on nothingness

Look closely. Can you see what they're hanging from??
Yes, it's paper clips!
4. Paper clips (optional)
Now I know paper clips sound crazy. But they totally work. Because you can hang them from the tulle and then hang whatever item you want on them. I made my holders from mini paper clips in 4 easy steps:

You can just open up the back-end of the paper clip instead of cutting it, but then you're left
with this ugly long tail that shows up through the tulle. They're much less of an eyesore this way.
So there you have it. A cheap and unique way of displaying and organizing all your jewelry. Plus I find that I wear so much more of my jewelry since I find myself every morning staring at my frames and asking myself "what should I wear today?!?"
Don't you think it's time you asked yourself the same question??
Yours in functional wall art,
Jacqueline


All I can say is....Wow...I am truly amazed by your range of talents...
ReplyDeleteJust wait til I break out the *real* powertools Tizoc!
ReplyDelete