Furniture facelift and bedroom makeover
In general, moving sucks. It's stressful and crazy and time consuming and unsettling. And nobody likes to do it.
It took 5-6 coats of green paint to get the perfect shade. But it's always better to do lots of thin coats than a few thick coats. That way you'll end up with a super smooth surface without drips and blobs of paint.
My new bed is a lot higher than my old one, so most of the headboard doesn't show anymore. But it's there, hidden behind my pretty pillows! (And yes, that's me, before and after.)
It still amazes me as to what a fresh coat of paint can do!!!! I even kept the original hardware, which went from antiquated hideousness to ornate freshness with a 3-second spray of paint.
There you have it folks. My mega bedroom project! So if you're interested in giving any old furniture a breath of new life, I suggest you run out and do it ASAP. I swear, I'd never done anything like this before in my life, and after a few days of reading and researching, I made it happen.
And for those of you interested in a few more details, here you go:
Note: wear a face mask during sanding, priming, and painting. Your lungs with thank you.
- Sand with 120 grit sandpaper
- Sand with 150 grit sandpaper
- Repair any holes/knicks with wood filler. Let dry then sand to smooth it out
- Wipe down with rag, then tack cloth, to remove all particulates
- Prime coat #1 (I used Zinsser spray primer since I had lots of furniture with nooks and crannies)
- Let dry
- Light sand with 150 or 180 grit sandpaper
- Prime coat #2. Dry. Light sand.
- Prime coat #3 if you need it. Unlikely for most pieces of furniture
- Paint or spray paint coat #1. (Make sure these are thin coats. Better to have lots of thin coats than a few thick coats) Repeat 3-6 times, depending on how well your coverage is going. I used a roller brush for my green drawers since they were pretty much flat. Super quick and gives really nice, smooth coverage. But a paintbrush is more appropriate for painting furniture with nooks and crannies
I bought polycrylic to finish the pieces, but noticed lots of bubbles in my test piece of wood. I'm still not 100% sure how to use that stuff, but I think if you decide to finish your furniture with polycrylic you'll need to use a paintbrush, not sponge roller (which is what I was using).
But after my cross-country move I realized it can also be cathartic to get rid of old things and let your creative side (in decorating a brand new place) run amok.


Sure, it's a bit of work, but not really all that much. And not only did I save money, but I was able to create custom pieces of furniture that were exactly what I wanted, all for ~$20 per piece!
Want to see what I was able to repurpose in this awesome DIY project?!
1. I converted an old (laminate) Target bookshelf into a shoe display/ makeup station
BEFORE AFTER
Because it was laminate and dark, this bookshelf required a few more layers of primer/paint. But it's totally do able to repaint crappy, non wood based furniture!! :)
Before I moved to Chicago I lived in my last apartment for 5 years. Yes. Five years. And although part of me loves that stability of not having to move every year, there are things that can get a little stagnant. Like my decorating.
And when your aesthetic taste changes over the years, it's hard to justify the cost of starting over for a decorative re-do. It's hard, that is, until you move...
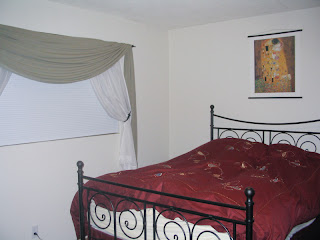
One thing I wanted to change in particular was my bedroom. My living room and bedroom furniture both had an "ethnic" flair. And while I love those kinds of furniture (deep woods, exotic influences, etc), having an entire apartment full of them makes it too heavy and dark.

My bedroom before...
So with my move I decided it was time for a drastic change. And it all started with my old roommate and her cool lamp.
I always loved my roommate's room, which was light, fresh, and had lots of color. I also loved this lamp she had. And when she moved, she was getting rid of it. So I quickly snatched it up and used that lamp to inspire my new bedroom!
I wanted to bring out the green in the lamp, and found this duvet cover that was modern and green. Perfect! And since I can't paint the walls in my room, I decided to paint some of my furniture to avoid a room that was overly white and boring.

...and my bedroom now!
I'm beyond excited with my new (and improved) bedroom! And would you believe I spent less than $150 on the whole shebang? That includes a "new" duvet, headboard, nightstand, dresser, and bookshelf! How so cheap? Well, you'll notice I used the word new in quotations. That's because although it's new to this bedroom, most of this furniture is faaaaar from new.
Just how far from new? Well, other than my Target bookshelf, the rest of the furniture is 30+ years old, and was in my bedroom when I was a baby/little kid. The only advantage to having a mom who's a hoarder is a plethora of old furniture to repurpose...
But I needed to figure out how I was going to refinish/paint all that old furniture, and thanks to Google I found some awesome decorating blogs. I read a ton of sites, but in the end, I used these to help me figure out the process:
Centsational Girl (my favorite tutorial), Sew Dang Cute, Decor and The Dog, and Creations by Kara.
So after a trip to my friend's place (to borrow an orbital sander- which is not required but helps for big, flat pieces of furniture) and Home Depot (for sanding paper, tack cloth, wood putty, primer, spray paint, green paint, and paint brushes)- I was ready to go.

Power tools make me feel powerful!
This project ended up taking two weekends, but that's because I was doing sooo much at once: a nightstand, dresser, bookshelf, and headboard. If you're doing a single piece, plan on 1-2 days. I won't get into all the details, because I'm far from an expert on this and the links I provided are more helpful than I would be. But at the end of this post I'll provide a few details on how I tackled my giant project.

Sanded, and ready to be primed and painted!
Sure, it's a bit of work, but not really all that much. And not only did I save money, but I was able to create custom pieces of furniture that were exactly what I wanted, all for ~$20 per piece!
Want to see what I was able to repurpose in this awesome DIY project?!
1. I converted an old (laminate) Target bookshelf into a shoe display/ makeup station
BEFORE AFTER
 |  |
To add extra shelves I had the awesome guys at Home Depot cut cheapo MDF to size for me and used 4 screws (screwed into the sides of the bookshelf) to hold the shelves. If I was using actual books on these shelves I would have used L brackets. But since shoes weigh pretty much nothing, simple screws are more than enough to hold up the MDF.
2. I converted my old dresser (that used to be in my nursery!) into a bright pop of color.
BEFORE AFTER
BEFORE AFTER
 |  |
3. I converted my old, ugly headboard into something simple and clean.
BEFORE (1982) AFTER (2011)
BEFORE (1982) AFTER (2011)
 |  |
4. I converted my old night stand into my absolute favorite piece of furniture in my new room (this photo does not do it justice...)
BEFORE AFTER
BEFORE AFTER
 |  |
It still amazes me as to what a fresh coat of paint can do!!!! I even kept the original hardware, which went from antiquated hideousness to ornate freshness with a 3-second spray of paint.
 |  |
There you have it folks. My mega bedroom project! So if you're interested in giving any old furniture a breath of new life, I suggest you run out and do it ASAP. I swear, I'd never done anything like this before in my life, and after a few days of reading and researching, I made it happen.
If Jackie can craft, so can you!
Note: wear a face mask during sanding, priming, and painting. Your lungs with thank you.
- Sand with 120 grit sandpaper
- Sand with 150 grit sandpaper
- Repair any holes/knicks with wood filler. Let dry then sand to smooth it out
- Wipe down with rag, then tack cloth, to remove all particulates
- Prime coat #1 (I used Zinsser spray primer since I had lots of furniture with nooks and crannies)
- Let dry
- Light sand with 150 or 180 grit sandpaper
- Prime coat #2. Dry. Light sand.
- Prime coat #3 if you need it. Unlikely for most pieces of furniture
- Paint or spray paint coat #1. (Make sure these are thin coats. Better to have lots of thin coats than a few thick coats) Repeat 3-6 times, depending on how well your coverage is going. I used a roller brush for my green drawers since they were pretty much flat. Super quick and gives really nice, smooth coverage. But a paintbrush is more appropriate for painting furniture with nooks and crannies
I bought polycrylic to finish the pieces, but noticed lots of bubbles in my test piece of wood. I'm still not 100% sure how to use that stuff, but I think if you decide to finish your furniture with polycrylic you'll need to use a paintbrush, not sponge roller (which is what I was using).


Comments
Post a Comment