Homemade samoas
What happens when you've been cooking up a storm, but have had very little motivation to blog? Well, you start to get way, way, wayyyyyy behind on keeping track of your recipes. So I wonder--instead of a photo a day project, could I attempt something similar to a blog a day project? I may not be able to do it every single night, but let's see how many I can knock out!
First up, in honor of Girl Scout cookie season, are homemade caramel deLites or samoas, depending on what part of the country you're from.

I was actually surprised at how close these cookies tasted to the original! Mine were a bit less sweet and had a slightly different cookie base, but the coconut was incredibly close to the original.
They really were the perfect treat, and were a huge hit with people. I didn't think they were too shabby either, especially with a glass of milk!
But I won't lie, these suckers took forever to make. Like 4 hours of active, non-stop cookie making. Between the cookie rolling and cutting and chilling and baking and toasting the coconut and unwrapping the caramels and mixing them together and carefully topping each cookie with the sticky coconut mixture bit by bit and drizzling with chocolate and dipping the bottoms in chocolate...what an endeavor!
BUT the recipe itself wasn't difficult, just time consuming. Plus, I got close to 80 cookies, so it's not too surprising it took that long.

While I may not attempt these cookies again due to the amount of time they took, I will FOR SURE be making the shortbread cookie (which was used for the base of this delicious treat) again and again.
The cookie recipe was incredibly simple and hands down the best shortbread recipe I've ever made. They were melt-in-your mouth buttery, without a hint of dryness that so plagues shortbread cookies.
While I would never, ever discourage anyone from buying a boatload of Girl Scout cookies, how about trying some at home next time. You know, if you have a day to spare. :)

Buen Provecho,
Jacqueline
Homemade Samoas (aka Caramel deLites), from Just a Taste
Yield: I got ~80 cookies with using 2" and 1" cookie cutters. The number you'll get from this full recipe will vary depending on your cookie size.
Although the shortbread cookie was absolute perfection from the oven, I did have some difficulties working with it. For a few of my tips, scroll all the way to the bottom.
Ingredients
For the cookies
1 cup (2 sticks) unsalted butter, at room temperature
1/2 cup sugar
2 cups all-purpose flour
1/4 teaspoon baking powder
1/2 teaspoon salt
2 Tablespoons milk
1/2 teaspoon vanilla extract
For the coconut topping
3 cups shredded sweetened coconut
15 ounces store-bought or homemade soft caramels
3 Tablespoons milk
1/4 teaspoon salt
For finishing
8 ounces dark chocolate (See Kelly's Notes)
Directions
Make the cookies

Just repeat the rolling/cutting/chilling/cooking process and follow the rest of the steps until you have 2 trays of this magic!
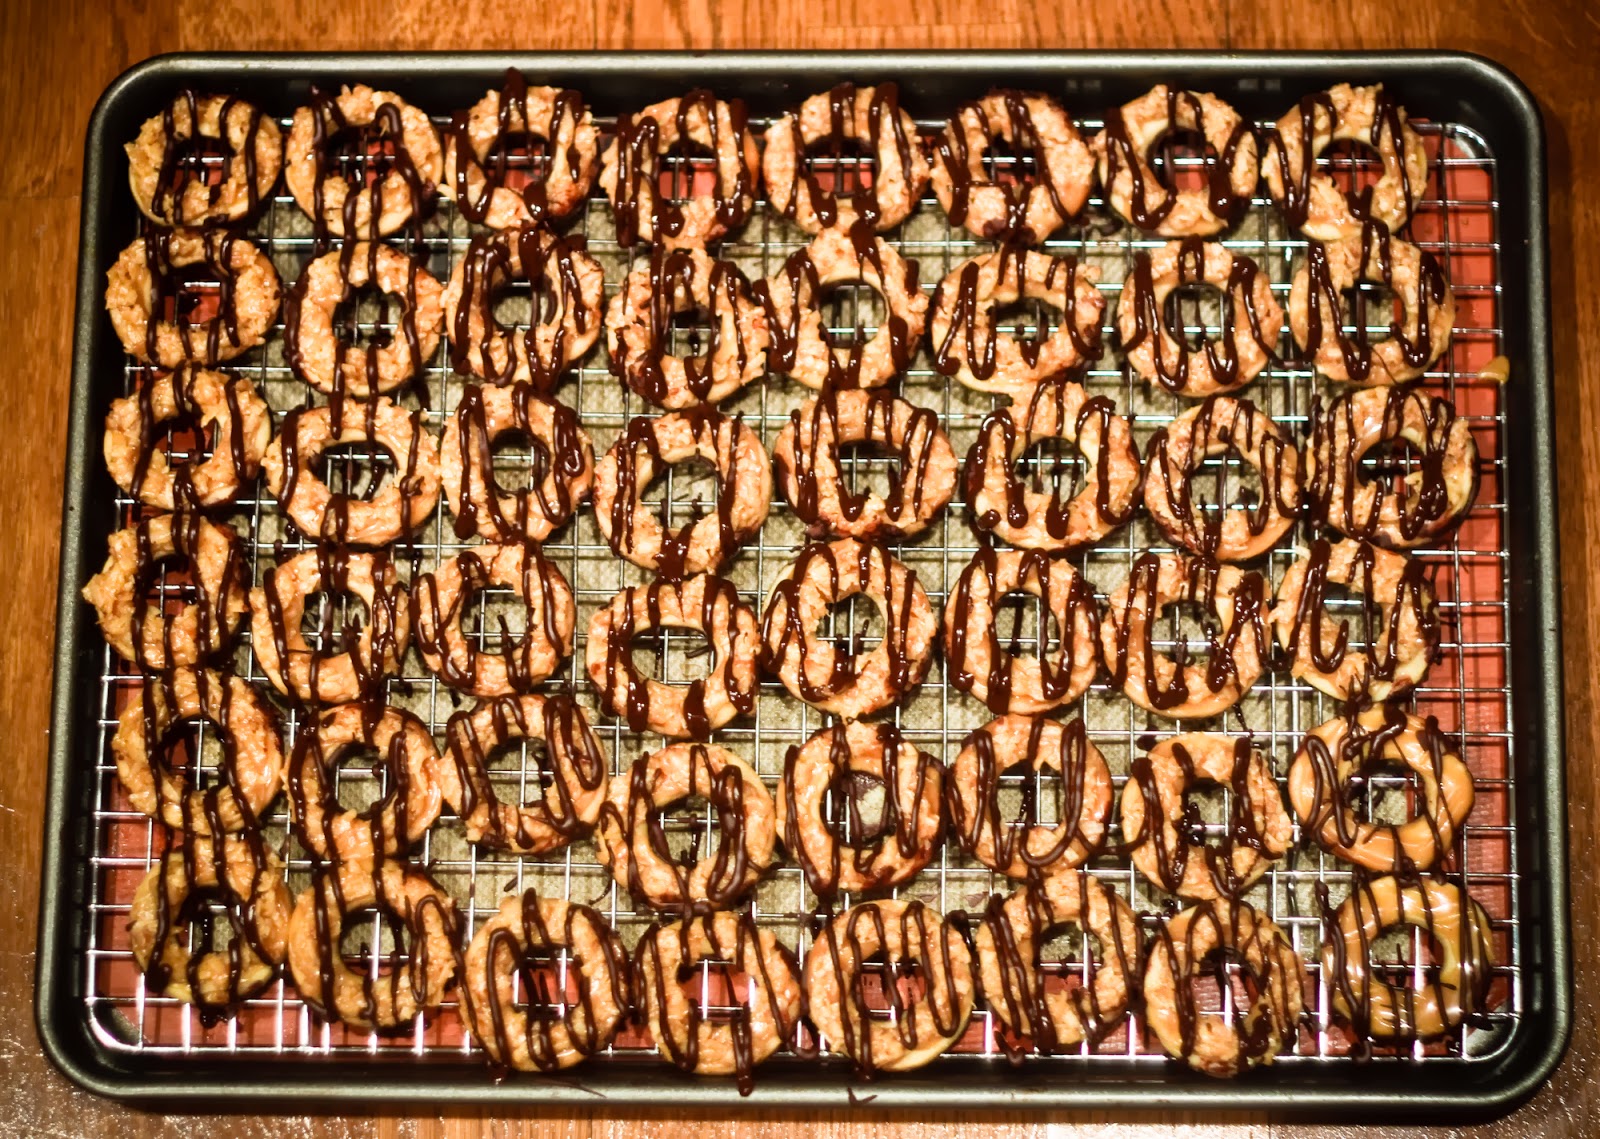
First up, in honor of Girl Scout cookie season, are homemade caramel deLites or samoas, depending on what part of the country you're from.
I was actually surprised at how close these cookies tasted to the original! Mine were a bit less sweet and had a slightly different cookie base, but the coconut was incredibly close to the original.
 |
| Something about toasted coconut just transforms the humble fruit |
They really were the perfect treat, and were a huge hit with people. I didn't think they were too shabby either, especially with a glass of milk!
 |
| My favorite way to eat a cookie |
But I won't lie, these suckers took forever to make. Like 4 hours of active, non-stop cookie making. Between the cookie rolling and cutting and chilling and baking and toasting the coconut and unwrapping the caramels and mixing them together and carefully topping each cookie with the sticky coconut mixture bit by bit and drizzling with chocolate and dipping the bottoms in chocolate...what an endeavor!
BUT the recipe itself wasn't difficult, just time consuming. Plus, I got close to 80 cookies, so it's not too surprising it took that long.
While I may not attempt these cookies again due to the amount of time they took, I will FOR SURE be making the shortbread cookie (which was used for the base of this delicious treat) again and again.
 |
| I wonder if the hole in the middle helped bake up these cookies more evenly... |
The cookie recipe was incredibly simple and hands down the best shortbread recipe I've ever made. They were melt-in-your mouth buttery, without a hint of dryness that so plagues shortbread cookies.
 |
| Pure golden deliciousness--I could have eaten the whole tray! |
While I would never, ever discourage anyone from buying a boatload of Girl Scout cookies, how about trying some at home next time. You know, if you have a day to spare. :)
Buen Provecho,
Jacqueline
Homemade Samoas (aka Caramel deLites), from Just a Taste
Yield: I got ~80 cookies with using 2" and 1" cookie cutters. The number you'll get from this full recipe will vary depending on your cookie size.
Although the shortbread cookie was absolute perfection from the oven, I did have some difficulties working with it. For a few of my tips, scroll all the way to the bottom.
Ingredients
For the cookies
1 cup (2 sticks) unsalted butter, at room temperature
1/2 cup sugar
2 cups all-purpose flour
1/4 teaspoon baking powder
1/2 teaspoon salt
2 Tablespoons milk
1/2 teaspoon vanilla extract
For the coconut topping
3 cups shredded sweetened coconut
15 ounces store-bought or homemade soft caramels
3 Tablespoons milk
1/4 teaspoon salt
For finishing
8 ounces dark chocolate (See Kelly's Notes)
Directions
Make the cookies
- In the bowl of a stand mixer fitted with the paddle attachment, cream together the butter and sugar until light and fluffy.
- In a separate bowl, whisk together the flour, baking powder and salt. In three increments, add the flour mixture to the creamed butter, mixing between each addition and scraping down the sides of the bowl as necessary. Add the milk and vanilla extract, blending until combined and the dough begins to come together in large pieces.
- Use your hands to divide the dough in half, pressing it together to compact it into two disks. Wrap the disks securely in plastic wrap and refrigerate them until firm, about 1 hour.
- Preheat the oven to 350ºF.
- Once the dough has chilled, roll each disk out onto a lightly floured surface until it is 1/8-inch thick. Cut out as many cookies as possible with a doughnut-shaped cookie cutter. (If the dough is too firm to roll out after being refrigerated, let it rest at room temperature for at least 10 minutes before rolling and cutting out the cookies.)
- Place the cut-out cookies on a Silpat or parchment paper-lined baking sheet. While you repeat the process with the remaining dough and scraps, put the baking sheet back in the refrigerator until the cookies are chilled.
- Remove cookies directly from the refrigerator and bake for 10 to 12 minutes, rotating the baking sheet half-way through, until the cookies are pale golden brown. Transfer the cookies to a wire wrack to cool completely. (The shortbread should be very pale golden in color. When in doubt, underbake it!)
- Spread the coconut flakes onto a baking sheet (lined with parchment paper if you like, but not necessary). Bake the coconut for about 10 minutes in a 350ºF oven until toasted, stirring frequently to ensure even browning and so that it does not burn. (Coconut burns very quickly, so keep an eye on it and stir often!) Remove the toasted coconut from the oven and set it aside.
- Melt the caramels, milk and salt in a double-boiler by placing the caramels in a medium saucepot set over a large saucepot of simmering water. Cook, stirring, until the caramels are fully melted. Alternatively, microwave ingredients in 20 second increments, stirring until caramels are fully melted.
- Combine 3/4 of the caramel with the toasted coconut in a large bowl, reserving the other 1/4 to spread directly on the cookies, which gives the coconut mixture a stickier base to adhere to.
- Carefully spread the remaining 1/4 cup of caramel atop the cooled cookies then press on a portion of the coconut mixture, bit by bit. This will be a very sticky process, but if you periodically dip the tip of your fingers in a small ramekin filled with warm water, that should substantially help.
- Let the cookies cool for 30 minutes. If the caramel-coconut mixture thickens too much at any point while pressing it onto the cookies, return it to the double-boiler or microwave and warm it until it's spreadable again.
- Melt the dark chocolate in a double-boiler or in the microwave. Dip the bottoms of the cookies in the chocolate and place them on a wax paper-lined baking sheet. Use a fork to drizzle the tops with chocolate. Let the cookies sit until the chocolate hardens fully.
Just repeat the rolling/cutting/chilling/cooking process and follow the rest of the steps until you have 2 trays of this magic!


Comments
Post a Comment