Apple pie (with a fool-proof all butter crust)
Two questions for you:
1. Do you like apple pie?
2. Are you intimidated by/scared of making pie?
If your answer is YES to either of those questions then you need to make this pie.

I've never had any major issues making pie dough in the past, but this recipe yielded the most flaky, delicious crust I've ever made (dare I say... or ever even had)!
It's a very unique technique that gives you a dough that is incredibly easy to deal with. (If you subscribe to Cooks Illustrated, here's the full article on how they developed this recipe. It's science people, SCIENCE!) So no expertise is needed at all! The only downside is that you need a food processor for the pie dough, but those without can still make the apple pie recipe below; just use your favorite pie crust.
But if you can, I'd really recommend you give this crust a shot! But only if you're a fan of pie crust that shatters in your mouth and melts into buttery goodness...

This post is going to be filled with a TON of step-by-step pictures. Because I love you all and I want you to get this pie in your belly, STAT. And I think that sometimes people (aka, me!) freak out when making a recipe for the first time and having photos of the process can be very reassuring.
If you don't want all my commentary, just scroll down for the final recipe. But just take a peek inside this beauty before you do.

And if you don't believe me when I tell you that this recipe kicks ass, just ask my friends that enjoyed the pie with me. (Hi ladies! And yes, I'm finally getting around to posting the recipe from last year...)

Let's take one more look at this stunner before getting into the nitty gritty, shall we?

First things first: make your dough the day before you're going to make your pie. Otherwise you'll have a long day.
I'm going to provide the *general* step-by-step recipes here, but the full recipe will be written in full below.
Buen Provecho,
Jacqueline
First up: the crust
The technique below is weird. I get it. But trust the process.


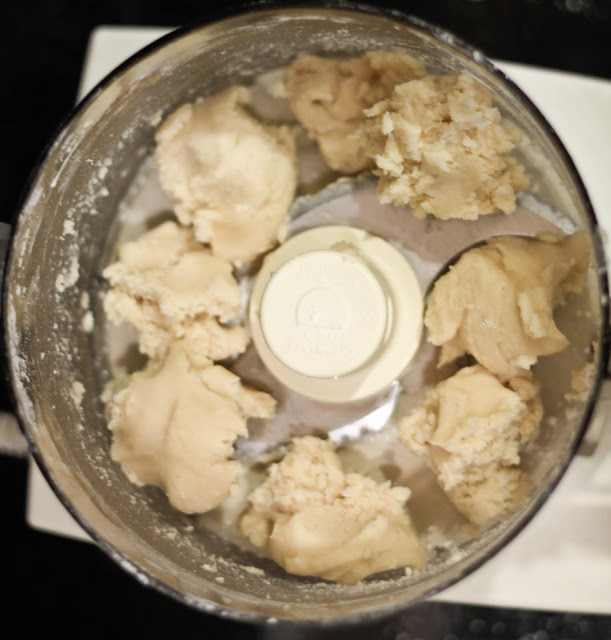
Using your hands, break the ball apart into about 8 pieces and distribute evenly in your food processor.
Sprinkle the remaining flour evenly over the "paste" and pulse until the mixture is broken into pieces. After that transfer this mixture to a bowl.

Now it's time for the *grated* butter. Yes, some of the butter in this recipe is grated and frozen beforehand. (Weird, I know, just trust... the... process.)

The grated butter then gets tossed with the mixture from your food processor.

You then sprinkle in some ice water and use a spatula to mix and press the dough until it sticks together. Divide the dough in half, wrap each in plastic wrap, and let the dough chill for a while. At least 2 hours, but preferably overnight.
You might notice that the dough feels a bit more "wet" than you're used to a pie dough feeling. It's OK. Nothing is wrong. Just wrap it and chill it. I promise everything will turn out in the end. (Repeat after me: Trust. The. Process.)

Next up: the filling
Ok, this part isn't that weird. You can basically just combine sugar and spices with your apples, throw them into your pie crust, and bake. I took it one step further and reduced the liquid from the apples to make a less liquidy pie. It's not absolutely necessary, but it helps. I'll show you below what I did.
First up, sugar gets combined with delicious spices and some lemon zest.

Then you sprinkle that delicious sweetness over a crap ton of apples. At this point you could simply fill your crust with these apples and call it a day.

But I took it a step further and let the apples macerate in the sugar for a while to release some of their liquid. Let them sit until they're bendy and pliable. (I waited about half an hour, but I read later that up to an hour is good.)
Like I said, you don't have to do this. But I'm glad I did, because these suckers released almost 1 cup of liquid!

But do NOT toss that liquid!!! It's liquid GOLD (figuratively... and literally). Just cook it down until it's reduced and thickened up a bit. Hey, if you're feeling it, go ahead and throw in a pad of butter after it's reduced. Because, butter.

Just make sure not to cook it down toooo much so you don't end up with a caramel. Mine was a tad thick, but it worked in the end.

The final step is to sprinkle your apples with a bit of flour. You're now ready to assemble!

Finally: assembling the pie
Ok, what I didn't tell you is that before you start preparing your pie filling you're going to want to roll out that that pie dough so it can take a nice long nap in the fridge before baking.
Cold dough = flaky dough. So you do NOT want to skimp out on the chilling process. When in doubt, chill it longer.
First up, roll out half your dough. (See all that grated butter in there?? Yummmm.)

Place it in your pie plate.

After it's had enough time to chill, fill with your apples.

See how puffy the crust got? My ridges on the edge of the pie are barely noticeable!

And I know that once you pull the pie out of the oven you'll want to cut into it right away. Do. Not. Touch. The. Pie.
Let the bad boy cool down. Not for 15 minutes. Not for 30 minutes. Not even for an hour. Nope, I'm talking 4 hours here folks. FOUR HOURS! Because it'll be like molten lava at the beginning, so you need the pie to chill out. Trust me, it's worth the wait.
One final note before getting to the recipe. You might notice, after cutting into your pie, a "gap" that has formed at the top of the pie. That's because your crust sets before your apples are done cooking, so they'll shrink down while your crust stays nice and tall.
Macerating the apples is supposed to help with that, but clearly it didn't completely solve this "issue" for me. But honestly, I was happy this happened to the pie because that top crust turned out shatteringly buttery and delicious without any moisture from the apples below.
So don't mind the gap. ;)

Onto the recipe!
Classic Apple Pie, pie filling and crust adapted from Cooks Illustrated
Note about the dough: This dough will appear much wetter than most pie doughs you've worked with. Fear not. This is normal and the dough will hydrate as it rests.
Note about the apples: You can use different kinds of apples if you can't find or don't love the ones suggested below. Golden Delicious and Braeburn are good choices based on this article, and I've also read that Honeycrisp, Empire, and Jonathan/Jonagold are good choices. I think I used a combo of Granny Smith and Honeycrisp (the latter being my personal favs). Basically any combination of a tarter apple + sweeter apple is what you're looking for.
Note about the timing: you'll want to make your pie dough (ideally) at least 1 day before baking your pie. And the pie needs 4 hours to cool. So plan accordingly.
1. Do you like apple pie?
2. Are you intimidated by/scared of making pie?
If your answer is YES to either of those questions then you need to make this pie.

I've never had any major issues making pie dough in the past, but this recipe yielded the most flaky, delicious crust I've ever made (dare I say... or ever even had)!
It's a very unique technique that gives you a dough that is incredibly easy to deal with. (If you subscribe to Cooks Illustrated, here's the full article on how they developed this recipe. It's science people, SCIENCE!) So no expertise is needed at all! The only downside is that you need a food processor for the pie dough, but those without can still make the apple pie recipe below; just use your favorite pie crust.
But if you can, I'd really recommend you give this crust a shot! But only if you're a fan of pie crust that shatters in your mouth and melts into buttery goodness...

This post is going to be filled with a TON of step-by-step pictures. Because I love you all and I want you to get this pie in your belly, STAT. And I think that sometimes people (aka, me!) freak out when making a recipe for the first time and having photos of the process can be very reassuring.
 |
| I put cute little flowers on the pie, but this was not necessary as they're not really noticeable on the final pie (and they tend to burn a bit). So do as I say, and not as I did. :) |
If you don't want all my commentary, just scroll down for the final recipe. But just take a peek inside this beauty before you do.

And if you don't believe me when I tell you that this recipe kicks ass, just ask my friends that enjoyed the pie with me. (Hi ladies! And yes, I'm finally getting around to posting the recipe from last year...)

Let's take one more look at this stunner before getting into the nitty gritty, shall we?

First things first: make your dough the day before you're going to make your pie. Otherwise you'll have a long day.
I'm going to provide the *general* step-by-step recipes here, but the full recipe will be written in full below.
Buen Provecho,
Jacqueline
First up: the crust
The technique below is weird. I get it. But trust the process.
First, you're going to mix together butter and flour until you get a nice paste-like ball; this should take less than a minute.

Using your hands, break the ball apart into about 8 pieces and distribute evenly in your food processor.

Sprinkle the remaining flour evenly over the "paste" and pulse until the mixture is broken into pieces. After that transfer this mixture to a bowl.

Now it's time for the *grated* butter. Yes, some of the butter in this recipe is grated and frozen beforehand. (Weird, I know, just trust... the... process.)

The grated butter then gets tossed with the mixture from your food processor.

You then sprinkle in some ice water and use a spatula to mix and press the dough until it sticks together. Divide the dough in half, wrap each in plastic wrap, and let the dough chill for a while. At least 2 hours, but preferably overnight.
You might notice that the dough feels a bit more "wet" than you're used to a pie dough feeling. It's OK. Nothing is wrong. Just wrap it and chill it. I promise everything will turn out in the end. (Repeat after me: Trust. The. Process.)
Next up: the filling
Ok, this part isn't that weird. You can basically just combine sugar and spices with your apples, throw them into your pie crust, and bake. I took it one step further and reduced the liquid from the apples to make a less liquidy pie. It's not absolutely necessary, but it helps. I'll show you below what I did.
First up, sugar gets combined with delicious spices and some lemon zest.

Then you sprinkle that delicious sweetness over a crap ton of apples. At this point you could simply fill your crust with these apples and call it a day.

But I took it a step further and let the apples macerate in the sugar for a while to release some of their liquid. Let them sit until they're bendy and pliable. (I waited about half an hour, but I read later that up to an hour is good.)
 |
| See! Bendy apples that don't easily snap in half when you fold them. |
Like I said, you don't have to do this. But I'm glad I did, because these suckers released almost 1 cup of liquid!

But do NOT toss that liquid!!! It's liquid GOLD (figuratively... and literally). Just cook it down until it's reduced and thickened up a bit. Hey, if you're feeling it, go ahead and throw in a pad of butter after it's reduced. Because, butter.

Just make sure not to cook it down toooo much so you don't end up with a caramel. Mine was a tad thick, but it worked in the end.

The final step is to sprinkle your apples with a bit of flour. You're now ready to assemble!

Finally: assembling the pie
Ok, what I didn't tell you is that before you start preparing your pie filling you're going to want to roll out that that pie dough so it can take a nice long nap in the fridge before baking.
Cold dough = flaky dough. So you do NOT want to skimp out on the chilling process. When in doubt, chill it longer.
First up, roll out half your dough. (See all that grated butter in there?? Yummmm.)

Place it in your pie plate.

After it's had enough time to chill, fill with your apples.

And then top it with the second rolled out crust and press the top and bottom crusts together to "seal" them.
To finish the pie, you'll want to tuck the dough under the lip of your pie plate, then use your thumb and forefingers to create very deep ridges on the side of the pie. Brush with egg, sprinkle with some sugar, and then chill it some more. After that this baby is ready for a trip in the oven!
One final note: definitely make those ridges on the side of the pie bigger than you think. Bigger than I have pictured here. This dough is going to puff up (a lot) and if they're wimpy little things you won't see the pretty pattern in the final pie.
 |
| And as I mentioned before, I made these little flower decorations (using scraps from the dough) but don't bother doing that for your pie. They'll just burn easy and you won't really see them all that well on the final pie. |
See how puffy the crust got? My ridges on the edge of the pie are barely noticeable!
And I know that once you pull the pie out of the oven you'll want to cut into it right away. Do. Not. Touch. The. Pie.
Let the bad boy cool down. Not for 15 minutes. Not for 30 minutes. Not even for an hour. Nope, I'm talking 4 hours here folks. FOUR HOURS! Because it'll be like molten lava at the beginning, so you need the pie to chill out. Trust me, it's worth the wait.
One final note before getting to the recipe. You might notice, after cutting into your pie, a "gap" that has formed at the top of the pie. That's because your crust sets before your apples are done cooking, so they'll shrink down while your crust stays nice and tall.
Macerating the apples is supposed to help with that, but clearly it didn't completely solve this "issue" for me. But honestly, I was happy this happened to the pie because that top crust turned out shatteringly buttery and delicious without any moisture from the apples below.
So don't mind the gap. ;)
Onto the recipe!
Classic Apple Pie, pie filling and crust adapted from Cooks Illustrated
Note about the dough: This dough will appear much wetter than most pie doughs you've worked with. Fear not. This is normal and the dough will hydrate as it rests.
Note about the apples: You can use different kinds of apples if you can't find or don't love the ones suggested below. Golden Delicious and Braeburn are good choices based on this article, and I've also read that Honeycrisp, Empire, and Jonathan/Jonagold are good choices. I think I used a combo of Granny Smith and Honeycrisp (the latter being my personal favs). Basically any combination of a tarter apple + sweeter apple is what you're looking for.
Note about the timing: you'll want to make your pie dough (ideally) at least 1 day before baking your pie. And the pie needs 4 hours to cool. So plan accordingly.
Note about the filling: While I really enjoyed the filling of this pie, next time I might try this recipe from Serious Eats, which has you parbake the apples at a specific temperature so that they don't release as much liquid but still hold their shape. (You can even use your sous vide if you have one!) The other benefit is that you can make the filling days ahead of time, further simplifying your pie-baking day.
Ingredients
Pie crust
20 TBSP (2 ½ sticks) unsalted butter, divided
2 ½ cups (12 ½ ounces) all-purpose flour, divided (highly recommend weighing the flour)
2 TBSP sugar
1 tsp salt
½ cup ice water, divided (tip: use a cocktail shaker to quickly chill some water; then measure out the liquid after chilled)
Filling
¾ cup granulated sugar
1 tsp lemon zest (from ~1 medium lemon)
1 TBPS lemon juice
¼ tsp table salt
¼ tsp ground nutmeg
¼ tsp ground cinnamon
⅛ tsp ground allspice
2 pounds Honeycrisp apples, peeled, cored, and sliced 1/4 inch thick (original recipe called for McIntosh; see note above)
1 ½ pounds Granny Smith apples, peeled, cored, and sliced 1/4 inch thick (see note above)
2 TBSP all-purpose flour
1 egg white, beaten lightly
1 TBSP granulated sugar, for topping
Directions
Make your crust:
- Grate 4 TBSP butter (½ stick) on a box grater using the large holes. Place in freezer. Also place a medium-sized bowl in the fridge at this time to chill it for later.
- Cut the remaining 16 TBSP butter (2 sticks) into ½-inch cubes.
- Pulse 1½ cups flour (7.5 oz), sugar, and salt in food processor until combined, about 2 pulses.
- Add cubed butter and process until a smooth and uniform paste forms, about 40 to 50 seconds.
- Using your hands, carefully break the paste into 8 pieces (about 2-inch chunks) and place evenly around the bowl of the food processor.
- Add remaining 1 cup flour (5 oz) and pulse approximately 4 to 5 times, or until mixture is broken into pieces no larger than 1 inch (most pieces will be much smaller).
- Transfer mixture to medium bowl (the one you chilled in the fridge). Add the frozen, grated butter and use a spatula to toss the mixture until all the butter pieces are separated and coated with flour.
- Sprinkle ¼ cup ice water over mixture. Toss with rubber spatula until mixture is evenly moistened. Sprinkle remaining ¼ cup ice water over mixture and toss to combine. Press dough with spatula until dough sticks together.
- Use spatula to divide dough into 2 portions. Transfer each portion to sheet of plastic wrap. Working with 1 portion at a time, draw edges of plastic over dough and press firmly on sides and top to form a compact mass. Wrap tightly in plastic and form into 5-inch disk. Repeat with remaining portion.
- Refrigerate dough for at least 2 hours or up to 2 days. Let chilled dough sit on counter to soften slightly, about 10 minutes, before rolling. (Wrapped dough can be frozen for up to 1 month. If frozen, let dough thaw completely on counter before rolling.)
- Prepping the crusts: Roll 1 disk of dough into a 12-inch circle on a well floured counter. Brush off any excess flour, then transfer dough to the pie plate (loosely roll dough around rolling pin and gently unroll it onto 9-inch pie plate, letting excess dough hang over edge). Ease dough into plate by gently lifting edge of dough with 1 hand while pressing into plate bottom with other hand. Leave any dough that overhangs plate in place. Wrap dough-lined pie plate loosely in plastic wrap and refrigerate until dough is firm, at least 30 minutes.
- Roll other disk of dough into 12-inch circle on lightly floured counter, then transfer to parchment paper or silpat–lined baking sheet; cover with plastic and refrigerate for at least 30 minutes.
- You can leave the pie doughs in the fridge for as long as it takes you to prepare your pie filling.
- Heat your oven: Adjust oven rack to lowest position, place an empty rimmed baking sheet on rack, and heat oven to 500 degrees. (Yes, you want to preheat your baking sheet in this step.) You can also wait until your apples are starting to macerate before turning on the oven.
- Prepare filling: Mix ¾ cup sugar, lemon zest, salt, nutmeg, cinnamon, and allspice together in large bowl. Add lemon juice and apples and toss until combined. Allow the apples to macerate for at least 30 minutes and up to 1 hour. Stir the mixture periodically to avoid browning of the apples.
- Pour the liquid that the apples have released in a small saucepan and reduce liquid by half to three-fourths. You want the liquid to be thick, but not cooked down into a caramel.
- Pour thickened apple juices back in the bowl with the apples and stir. Sprinkle with 2 TBSP flour and stir to combine.
- Assemble your pie: Spread apples with their juices into dough-lined pie plate, mounding them slightly in middle. Place upper crust on top of the apples (loosely roll the remaining dough round around a rolling pin and gently unroll it onto filling).
- Trim overhang to ½ inch beyond lip of pie plate, if needed. (Do not discard; turn your extra dough into easy cookies!) Pinch edges of top and bottom crusts firmly together. Tuck overhang under itself; folded edge should be flush with edge of pie plate. Crimp dough evenly around edge of pie using your fingers. (Here's a short video you can watch if you're interested.)
- Brush surface with beaten egg white and sprinkle evenly with remaining 1 tablespoon sugar. Cut four 2-inch slits in top of dough.
- Place pie on heated baking sheet, reduce oven temperature to 425 degrees, and bake until crust is light golden brown, about 25 minutes. Reduce oven temperature to 375 degrees, rotate baking sheet, and continue to bake until juices are bubbling and crust is deep golden brown, 30 to 35 minutes longer.
- Let pie cool on wire rack to room temperature, about 4 hours.


Comments
Post a Comment