Betty's cake
I have a friend who probably loves my cakes more than anyone else I know.
I mean sure, I think I do a good job on my cakes. And sometimes I think I do a great job. But Betty, I swear, Betty always makes it sound like I'm freaking Duff Goldman. I may not always agree with her, but it's great to have someone who believes in you that much.
Last year for Betty's birthday I made a shoe-box cake (with a pretty rockin' gumpaste shoe, if I do say so myself), but this year she wanted something totally different- a world cup cake. She left it up to me to design and execute the cake, which was a fun challenge and exercise.
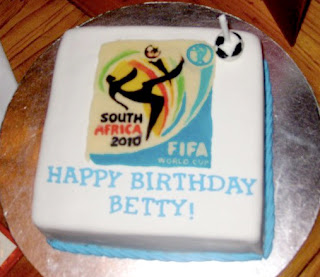
I was beyond happy with how the FIFA logo came out, but I didn't really love the way I decorated the rest of the cake, in particular the rope border. But Betty was beside herself in happiness, so needless to say, that was enough for me to be pleased.

So how did I execute this masterpiece?! Well, I have some awesome photos to demonstrate. Follow along if you care. If not, just skip to the end of the post for the amazing recipes. Because not only did this cake look good, it tasted awesome! Old fashioned chocolate cake with coffee (whipped) buttercream frosting. Dee-lish. I mean just look at it...

In thinking about how to replicate the FIFA logo, I immediately realized that the best, and easiest, way would be to use a melted chocolate technique (another detailed write-up on the process can be found here).
Setp #1: Print out your logo or image or text (or whatever you want to pipe out) IN REVERSE and cover with parchment paper. That's because what you pipe onto the parchment is going to be flipped over, so what touches the parchment is actually the front of your chocolate piece.

Step #2: Start with either outlining your image or piping the front-most object in your image first. Here, I filled in the soccer player (using chocolate colored with black food coloring), the text (using colored white chocolate), the soccer ball and the beginnings of the colored part of the logo.

Note: Make sure to pipe it pretty thick (when you can) and give it plenty of time to dry (a few to 10 minutes, or more if needed). That way when you start layering the next round of melted chocolate on top the heat from the chocolate won't mess up what you've piped out.

Step #3: Continue with your image, layering the melted chocolate by either piping it out or brushing it on (for more artistic touches, like when the colors transition from red to orange).


I mean sure, I think I do a good job on my cakes. And sometimes I think I do a great job. But Betty, I swear, Betty always makes it sound like I'm freaking Duff Goldman. I may not always agree with her, but it's great to have someone who believes in you that much.
Last year for Betty's birthday I made a shoe-box cake (with a pretty rockin' gumpaste shoe, if I do say so myself), but this year she wanted something totally different- a world cup cake. She left it up to me to design and execute the cake, which was a fun challenge and exercise.

Forgot to take a pic of the completed cake at home, so all I got
were pics from the restaurant
were pics from the restaurant

Birthday girl with her cake, complete with soccer ball candle holder

I will spare you the knowledge about how much butter is in the cake and frosting... but I will let you know that this recipe is, hands down, my favorite chocolate cake recipe.
Setp #1: Print out your logo or image or text (or whatever you want to pipe out) IN REVERSE and cover with parchment paper. That's because what you pipe onto the parchment is going to be flipped over, so what touches the parchment is actually the front of your chocolate piece.

Step #2: Start with either outlining your image or piping the front-most object in your image first. Here, I filled in the soccer player (using chocolate colored with black food coloring), the text (using colored white chocolate), the soccer ball and the beginnings of the colored part of the logo.

Note: Make sure to pipe it pretty thick (when you can) and give it plenty of time to dry (a few to 10 minutes, or more if needed). That way when you start layering the next round of melted chocolate on top the heat from the chocolate won't mess up what you've piped out.

See, the chocolate isn't just a super thin layer. It's got a little bit of thickness to it.

Don't worry, I know it looks crappy. Remember, this is the backside of the image.
The front will be awesome...
Step #4: Once you are "done" you need to cover the whole thing with a thick layer of chocolate. Don't skimp on the chocolate, as this will literally glue the whole image together. I've used white chocolate as my binder. Give it PLENTY of time to dry (feel free to pop it in the fridge for a bit if you're impatient like me). You've got to make sure the chocolate is nice and hard before attempting to flip it over.

Step #5: The moment of truth... What will your logo look like?!? Will it have air bubbles? Will it look like complete crap?! This is when you find out. Luckily mine came out pretty awesome. Here's a side-by-side comparison of my logo next to the actual logo.

Pretty freaking awesome, no?!? The only thing I wish is that the white chocolate melts I used were more white so the background wouldn't have blended in so much with the yellow elements. It wasn't quite as bad as the picture above makes it seem, but it was a bit too cream colored. Ahhh well, either way it worked out pretty well!
Buen Provecho,
Jackie
Want the recipes for the cake and frosting?!? You can find them by clicking Read More below.
Old fashioned chocolate cake, from Cooks Illustrated
Ingredients
12 tablespoons unsalted butter (1 1/2 sticks), very soft, plus extra for greasing pans
1 3/4 cups unbleached all-purpose flour (8 3/4 ounces), plus extra for dusting pans
4 ounces unsweetened chocolate , coarsely chopped
1/4 cup Dutch-processed cocoa (3/4 ounce)
1/2 cup hot water
1 3/4 cups sugar (12 1/4 ounces)
1 1/2 teaspoons baking soda
1 teaspoon table salt
1 cup buttermilk
2 teaspoons vanilla extract
4 large eggs
2 large egg yolks
Directions
1. Adjust oven rack to middle position; heat oven to 350 degrees. Grease two 9-inch-round by 2-inch-high cake pans with softened butter; dust pans with flour and knock out excess. Combine chocolate, cocoa powder, and hot water in medium heatproof bowl; set bowl over saucepan containing 1 inch of simmering water and stir with rubber spatula until chocolate is melted, about 2 minutes. Add 1/2 cup sugar to chocolate mixture and stir until thick and glossy, 1 to 2 minutes. Remove bowl from heat and set aside to cool.
2. Whisk flour, baking soda, and salt in medium bowl. Combine buttermilk and vanilla in small bowl. In bowl of standing mixer fitted with whisk attachment, whisk eggs and yolks on medium-low speed until combined, about 10 seconds. Add remaining 1 1/4 cups sugar, increase speed to high, and whisk until fluffy and lightened in color, 2 to 3 minutes. Replace whisk with paddle attachment. Add cooled chocolate mixture to egg/sugar mixture and mix on medium speed until thoroughly incorporated, 30 to 45 seconds, pausing to scrape down sides of bowl with rubber spatula as needed. Add softened butter one tablespoon at a time, mixing about 10 seconds after each addition. Add about one-third of flour mixture followed by half of buttermilk mixture, mixing until incorporated after each addition (about 15 seconds). Repeat using half of remaining flour mixture and all of remaining buttermilk mixture (batter may appear separated). Scrape down sides of bowl and add remaining flour mixture; mix at medium-low speed until batter is thoroughly combined, about 15 seconds. Remove bowl from mixer and fold batter once or twice with rubber spatula to incorporate any remaining flour. Divide batter evenly between prepared cake pans; smooth batter to edges of pan with spatula.
3. Bake cakes until toothpick inserted into center comes out with a few crumbs attached, 25 to 30 minutes. Cool cakes in pans 15 minutes, then invert onto wire rack. Cool cakes to room temperature before frosting, 45 to 60 minutes.
Coffee whipped buttercream frosting, adapted from Kathy in my cake club
Note: this frosting literally has the texture and consistency of whipped cream but only uses milk (or milk substitute to make it completely dairy free). But I took it a step further and replaced all the liquid with strongly brewed coffee for a coffee whipped buttercream. So feel free to replace the milk with any other liquid you'd like for a unique twist on buttercream frosting (orange juice, watered down liquor, etc).
Ingredients
4 TBSP flour
1 cup milk, milk substitute (soy/rice milk) or other liquid (coffee*, juice, etc)
1/2 cup butter, or margarine
1/2 cup shortening (I replaced the shortening with butter for an all-butter recipe)
1 cup sugar
2 tsp vanilla
pinch salt
*for coffee add 2 tsp powdered coffee in 1 cup hot water with a healthy splash of Bailey's. Allow to cool slightly before using.
Directions
1. In a small saucepan, slowly add milk to your flour until they are completely mixed. The liquid is added slowly to ensure a smooth and lump-free consistency. (If your mixture is lumpy you can pass it through a fine-mesh strainer)
2. Cook flour and liquid mixture over low heat for at least a few minutes, stirring constantly, until thickened. Remove from heat and periodically whisk the mixture as it cools. Cool to room temperature.
3. While the flour is cooling, beat butter (and shortening, if using) on medium speed using whisk attachment* on stand mixer for 4 minutes.
4. Slowly add sugar and beat butter another 4 minutes.
5. Add flour paste and beat another 4 minutes. Add vanilla and salt and mix to combine, ~1 minute.
*you can use the paddle attachment but the whisk results in a fluffier frosting.
Note: If using milk make sure to refrigerate the frosting. If another liquid was used instead, the frosting is fine out at room temperature for a day (probably a few more...)


Comments
Post a Comment