Microchip cookies
It's the 27th of the month folks, so you (might) know what that means: Daring Bakers time!
The September 2010 Daring Bakers’ challenge was hosted by Mandy of “What the Fruitcake?!” Mandy challenged everyone to make Decorated Sugar Cookies based on recipes from Peggy Porschen and The Joy of Baking.


Rolled Buttercream, adapted from Cake Central Recipes
Note: I cut this recipe down by 1/4 and I probably only used about half of the amount I made. But that's because I rolled the buttercream SUPER thin (to keep the cookies from getting too sweet). I'd advise 1/4 to 1/2 a recipe for a batch of cookies, depending on the thickness of the rolled buttercream.
Ingredients
1 cup shortening
1 cup light corn syrup
1/2 tsp salt
1/2 tsp orange oil
1/4-1/2 tsp almond extract, optional
~8 1/2 cups powdered sugar
Directions
1. Place Shortening into a large mixer bowl and cream on medium speed until smooth.
2. While mixer is running, add corn syrup, salt, and flavorings and mix until well blended.
3. Reduce speed to low and gradually add about 2/3 of the powdered sugar until soft dough is formed.
4. Turn mixture out onto surface dusted with powdered sugar.
5. Knead in the reamining 1/3 of the sugar. Continue kneading until buttercream is smooth.
6. If it is sticky add more icing sugar, a little at a time.
7. Chill for a few hours. Before use, bring rolled buttercream to room temp.
Storage: One week at toom temp. One month refrigerated. Three months frozen.
Royal Icing, adapted from Joy of Baking
Note: Not So Humble Pie is an amazing tutorial on royal icing. Check it out!
Ingredients
2 1/2 to 3 cups (315g – 375g or 11oz – 13oz) powdered sugar, unsifted
2 large egg whites (use re-hydrated pasteurized egg whites or egg beaters whites if you want to avoid raw eggs)
2 tsp lemon juice
1 tsp almond extract, optional (or orange oil, lemon oil, etc)
Directions
1. Beat egg whites with lemon juice until combined. (Tip: It’s important that the bowls/spoons/spatulas and beaters you use are thoroughly cleaned and grease free.)
2. Sift the icing sugar to remove lumps and add it to the egg whites. (Tip: I’ve listed 2 amounts of icing sugar, the lesser amount is good for a flooding consistency, and the larger amount is for outlining, but you can add even more for a much thicker consistency good for writing. If you add too much icing sugar or would like to make a thinner consistency, add very small amounts of water, a few drops at a time, until you reach the consistency you need.
3. Beat on low until combined and smooth. Use immediately or keep in an airtight container.
(Tip: Royal Icing starts to harden as soon as it’s in contact with air so make sure to cover containers with plastic wrap while not in use.)
Sugar Cookie, adapted from Peggy Porschen.
Note: I do not recommend this recipe very much. Not horrible. But not great either.
Ingredients
The September 2010 Daring Bakers’ challenge was hosted by Mandy of “What the Fruitcake?!” Mandy challenged everyone to make Decorated Sugar Cookies based on recipes from Peggy Porschen and The Joy of Baking.
Decorated cookies- what fun!! This was the perfect challenge for me because even though I've decorated a bunch of cakes, I've never really sat down and decorated cookies before. They're so damn time consuming so I've just never bothered. But I always felt that my decorator street cred needed this experience.
But there was one (small) guideline our inner artist had to abide by. The cookies had to be decorated with a "September" theme- whatever that meant to us.
Ummmm, September?? Really?? I mean it's kinda this weirdo month that doesn't really resonate much with me personally.
Sure, it's the beginning of a new school year. But I I don't have kids that are going back to school in September so I didn't want to make school related cookies. Sure, it's "technically" the start of fall. But it's been in the 90s this past weekend in California so I hope you'll excuse me for not feeling like a new season is upon us just yet to make fall themed cookies.
No major holidays, no major parties I was going to. Hmmmm, what to make? What to make?
No major holidays, no major parties I was going to. Hmmmm, what to make? What to make?
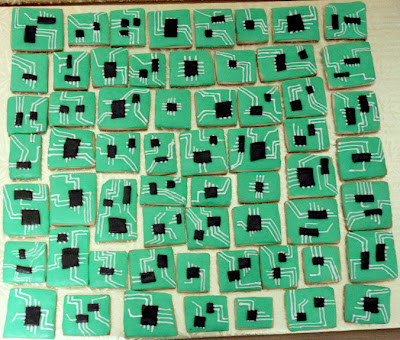
And then it hit me: microchips!!
In mid September we opened up our newest gallery at the museum: the Silicon Valley Innovation Gallery. And at the heart of the gallery lies the revolutionary technology called the microchip.

Over 50 microchip cookies!
Instead of decorating the cookies with royal icing, which is traditional, I decided to go with a rolled buttercream (shortening with enough powdered sugar added until it's malleable). Why rolled buttercream?
a. I've always wanted to try it.
b. I hate how sickeningly sweet royal icing is. And with decorating cookies you need a pretty thick layer of it, which pretty much makes the cookies inedible for me.
c. Rolled buttercream is also ridiculously sweet, but you can roll it super duper thin so its not so bad (Also, its easier to remove from a cookie so if people don't want the sweetness they can get rid of it.)
d. With rolled buttercream I wouldn't have to wait hours, or days, for my royal icing to completely dry. Just plop it on the cookies and they're done!

See how thin the green layer is?
The green and the black parts were rolled buttercream, whereas the white lines were individually piped using royal icing. Yes, it took hours just to decorate the cookies. They're such a pain in the a$$.

For each cookie I thinly rolled out a bit of green buttercream
and placed it on the cookie. Then I used a small knife to cut around
the edges. That way each cookie was completely covered with the
green buttercream. (If you used a cookie cutter for your cookies you could
simply use the same cutter for the rolled buttercream.) Don't worry
about tears, the rolled buttercream is soo soft and malleable
that you can simply use your fingers to press and patch it up.
But, even I'll admit they came out looking pretty damn good! And people at work got a kick out of them so I think they were worth all those hours of fun.
Yours in delicious edible artwork,
Jackie
Recipes, with a few simple "how to" details from me after the link.
Note: the cookie recipe was easy to work with, but I won't make it again. Yes, the cookies held their shape very nicely. But they were a bit dry and flavorless and "flour-y" to me. The only good thing was that because this cookie recipe is made for decorated cookies, the cookie itself was not very sweet (i.e. they didn't taste very good by themselves). But once you put the rolled buttercream/ royal icing on, the sweetness level was much better.
Still, I've tasted lots of delicious decorated sugar cookies out there and this one just wasn't up to par for me. Next time I'm trying this one from Not So Humble Pie.
Rolled Buttercream, adapted from Cake Central Recipes
Note: I cut this recipe down by 1/4 and I probably only used about half of the amount I made. But that's because I rolled the buttercream SUPER thin (to keep the cookies from getting too sweet). I'd advise 1/4 to 1/2 a recipe for a batch of cookies, depending on the thickness of the rolled buttercream.
Ingredients
1 cup shortening
1 cup light corn syrup
1/2 tsp salt
1/2 tsp orange oil
1/4-1/2 tsp almond extract, optional
~8 1/2 cups powdered sugar
Directions
1. Place Shortening into a large mixer bowl and cream on medium speed until smooth.
2. While mixer is running, add corn syrup, salt, and flavorings and mix until well blended.
3. Reduce speed to low and gradually add about 2/3 of the powdered sugar until soft dough is formed.
4. Turn mixture out onto surface dusted with powdered sugar.
5. Knead in the reamining 1/3 of the sugar. Continue kneading until buttercream is smooth.
6. If it is sticky add more icing sugar, a little at a time.
7. Chill for a few hours. Before use, bring rolled buttercream to room temp.
Storage: One week at toom temp. One month refrigerated. Three months frozen.
Royal Icing, adapted from Joy of Baking
Note: Not So Humble Pie is an amazing tutorial on royal icing. Check it out!
Ingredients
2 1/2 to 3 cups (315g – 375g or 11oz – 13oz) powdered sugar, unsifted
2 large egg whites (use re-hydrated pasteurized egg whites or egg beaters whites if you want to avoid raw eggs)
2 tsp lemon juice
1 tsp almond extract, optional (or orange oil, lemon oil, etc)
Directions
1. Beat egg whites with lemon juice until combined. (Tip: It’s important that the bowls/spoons/spatulas and beaters you use are thoroughly cleaned and grease free.)
2. Sift the icing sugar to remove lumps and add it to the egg whites. (Tip: I’ve listed 2 amounts of icing sugar, the lesser amount is good for a flooding consistency, and the larger amount is for outlining, but you can add even more for a much thicker consistency good for writing. If you add too much icing sugar or would like to make a thinner consistency, add very small amounts of water, a few drops at a time, until you reach the consistency you need.
3. Beat on low until combined and smooth. Use immediately or keep in an airtight container.
(Tip: Royal Icing starts to harden as soon as it’s in contact with air so make sure to cover containers with plastic wrap while not in use.)
Sugar Cookie, adapted from Peggy Porschen.
Note: I do not recommend this recipe very much. Not horrible. But not great either.
Ingredients
200g / 7oz / ½ cup + 6 Tbsp Unsalted Butter, at room temperature
400g / 14oz / 3 cups + 3 Tbsp All Purpose / Plain Flour
200g / 7oz / 1 cup Caster Sugar / Superfine Sugar
1 Large Egg, lightly beaten
5ml / 1 tsp Vanilla Extract / Or seeds from 1 vanilla bean
Directions
1. Cream together the butter, sugar and any flavourings you’re using. Beat until just becoming creamy in texture. Tip: Don’t over mix otherwise you’ll incorporate too much air and the cookies will spread during
baking, losing their shape.
2. Beat in the egg until well combined, make sure to scrape down the sides of the bowl.
Add the sifted flour and mix on low until a non sticky dough forms. (use dough hook?)
3. Knead into a ball and divide into 2 or 3 pieces. Roll out each portion between parchment paper to a thickness of about 5mm/1/5 inch (0.2 inch) Refrigerate for a minimum of 30mins.
4. Once chilled, peel off parchment and place dough on a lightly floured surface. Cut out shapes with cookie cutters or a sharp knife.
5. Arrange shapes on parchment lined baking sheets and refrigerate for another 30mins to an hour. (Tip: It’s very important you chill them again otherwise they’ll spread while baking.)
6. Re-roll scraps and follow the above process until all scraps are used up.
7. Preheat oven to 180°C (160°C Fan Assisted) / 350°F / Gas Mark 4. Bake until golden around the edges, about 8-15mins depending on the size of the cookies.
(Tip: Bake same sized cookies together otherwise mixing smaller with larger cookies could result in some cookies being baked before others are done.
Tip: Rotate baking sheets half way through baking if your oven bakes unevenly.
8. Leave to cool on cooling racks. Once completely cooled, decorate as desired.
(Tip: If wrapped in tinfoil/cling wrap or kept in airtight containers in a cool place, un-decorated cookies can last up to a month.)


great idea! sooo cute and clever.
ReplyDeleteHow unique and clever! I love your microchip cookies:)
ReplyDeleteVery creative! Piping those thin white lines must have been hard! Great job!
ReplyDeleteYour microchip cookies are a great idea. And very precisely decorated - wow! Congratulations on a great challenge!
ReplyDelete