Masquerade birthday cake
Hellllloooooooooo everyone! Welcome to my first blog post as a Chicagoan.
I made my official cross-country move from Palo Alto to Skokie a few weeks ago and have pretty much settled my stuff into my parent's house as much as I can. It'll be hard adjusting to living in a place that technically isn't my own space, but I'll make do. It helps having my own room that I can retreat to and a closet I can organize the crap out of. Let me tell you, having shirts grouped together by sleeve length and arranged in rainbow order brings more joy to me than you can possibly imagine...
Although it's been a relatively smooth transition, that doesn't mean the move hasn't come with its fair share of contrasting emotions. Moving back home hasn't been that hard, but leaving the place I've called home for the past 6 1/2 years, along with all the friends I've made along the way, hasn't been easy. These past few weeks I've been excited, sad, frustrated, happy, angry, bored, overwhelmed, pensive, and challenged.
One thing that really helped though was getting back into the kitchen.
My younger cousin Arbela, who recently started a wedding and party planning company with her friend in Chicago, asked me to make a cake for a 21st birthday party she was throwing. And of course I had to do it! I was told that the Masquerade themed party was a formal event for ~100 people and the primary colors of the party were purple and gold. Other than that I was free to do whatever I wanted. SWEET!!! I love cake orders that give me lots of creative freedom.
And here's what I came up with (with a little help from the interwebs for ideas)
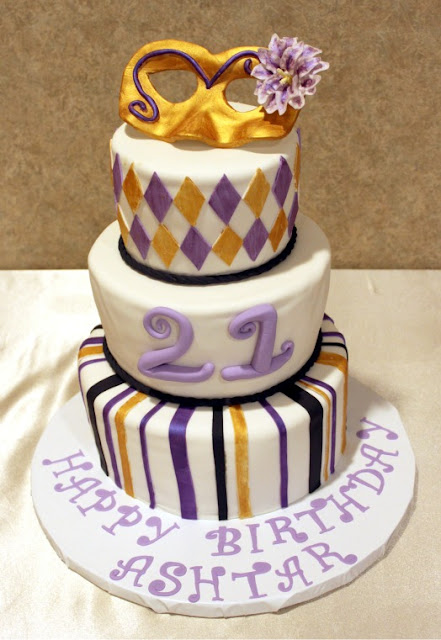
There were two things I was most proud of with this cake:
(1) The mask topper.
Made of fondant (with tylose powder added, for all my cake decorating peeps in the know), I hand cut it and molded it using a knife and tissue paper. The flower was just a random thing I put together and not based upon a real (biological) flower. But I loved it anyways.


(2) I was also extremely happy with how clean my fondant work was this time. I didn't even need a border on the bottom layer. WHOOP!!

For those interested in the cake recipes, I split a single recipe of Guinness chocolate cake into two 6" and two 8" pans (that recipe makes so much batter that it fit the 4 pans PERFECTLY) and a recipe of yellow layer cake into the two 10" pans. Filling was the frosting I always make: Italian meringue buttercream. I can't believe I haven't blogged about the recipe yet, so I'll include that at the end of the post.
And because I like to give credit where credit is due (blame the scientist in me), here are the inspiration photos I used for the cake and the mask topper:
But in the end, I definitely made it all my own!

Yours in sweet beginnings,
Jacqueline
Italian meringue buttercream, adapted from The Whimsical Bakehouse
There are tons of recipes out there for Italian meringue buttercream, which basically involves beating egg whites to a hard peak, adding a boiling sugar water mixture heated to 248 degrees F, mixing until cool to the touch, and adding butter in at the end. I basically follow the same method but use reconstituted powdered egg whites instead of fresh egg whites. Because they're pasteurized, I don't have to worry about bringing the sugar water to the right temperature- I just boil it for a few minutes to heat it up.
If you want to go the traditional method using fresh eggs, you can follow the directions from this recipe. The say that the proper sugar temperature is required for the buttercream to "hold" itself properly. From my experience, when I use the powdered egg whites it really makes no difference if I boil the sugar water for 10 seconds or properly heat it up to 248˚F. I've never done a proper side by side comparison though, so if you're worried, feel free to bring the sugar water to 248˚.
Also, if you compare my recipe to other Italian meringue recipes out there you'll notice mine uses a much lower ratio of butter to egg whites. Personally I prefer it this way. Italian meringue buttercream is pretty buttery and I think my recipe yields a much lighter, less greasy frosting. But feel free to experiment and add up to 2 more sticks of butter to the recipe if you'd like.
Phew, that was a lot to say. Who knew a damn buttercream frosting could be so complicated!
Yield: 8 cups. That was enough frosting to fill and crumb coat my 3 cakes (6"/8"/10"), but not enough to frost them too. Feel free to cut this recipe in 1/2 or 1/4 if you want less. But do not increase-- it already fills up almost the entire 5 qt Kitchen Aid mixer!
Ingredients
1/2 cup water
2 1/4 cups sugar
reconstituted powdered egg whites, equivalent to 12 whites (For the brand I use, that's 1/2 cup powdered egg whites + 1 to 1 1/2 cups water)
Directions
1. Combine water and sugar in medium sized pot and heat on medium. Do not stir or touch or do anything to the sugar to keep sugar crystal formation at a minimum. Just walk away and allow the heat to do all the work by bringing the mixture to a low boil. Boil for anywhere from 1-7 minutes. (Because we're using powdered egg whites, I don't think it really matters what temperature the sugar mixture is at.) While the sugar is heating up, prepare your egg whites...
2. Reconstitute your powdered egg whites according to the instructions on the container. Using a wire whisk, beat the eggs on medium high until they and firm and form hard peaks. Add a pinch of cream of tartar if you'd like, but it's not necessary.
Note: At this point, you've got to keep an eye both on your sugar mixture and your egg whites. In the ideal world your sugar will be a low boil for a few minutes (no more than 7ish) just as your egg whites are forming peaks. But watch out: you don't want to overheat the sugar (nothing past 248˚F) or overbeat the egg whites! If your sugar is boiling for 5-7 minutes and your egg whites are not done yet, lower the heat to keep the sugar at a simmer until the eggs are done.
This really isn't as hard as I'm making it sound, I promise...
3. When the egg whites are stiff, turn the mixer to low. Carefully transfer the boiling sugar water to a glass measuring cup and slowly add the sugar to the egg whites. I like to do this with the mixer going, making sure to avoid the wire whisk.
4. Once all the sugar has been added, keep the mixer running on low (or medium low) until the bowl is no longer hot and has reached room temperature. This usually takes ~20+ minutes for me.
Note: You could speed up the process by adding cold towels to the outside of the bowl, but I just let the machine go and start cleaning up the mess that is my kitchen at this point...
5. Once the egg whites are cool to the touch, you can start adding the butter 1-2 TBSP at a time. Allow to mix for a few seconds before adding the next TBSP of butter.
Note: you can use either the wire whip or paddle attachment when adding the butter. I like using the wire whip for a lighter, fluffier frosting. Use the paddle if you'd like to incorporate less air into your frosting.
6. Once all your butter has been added your frosting may look curdled or wet. DO NOT FREAK OUT!!! No, you did not mess up. This is 100% totally normal. All you have to do is KEEP BEATING THE FROSTING. That's it. Sometimes it takes a few minutes, sometimes it takes a lot more. Either way, it'll come together eventually. Just turn up the mixer to medium or medium high speed and let it do all the work. It'll magically go from a gloppy, wet mess to a perfectly luscious frosting in no time. I promise.
7. Add any extracts or flavorings that you want after the buttercream has come together. Enjoy!
I made my official cross-country move from Palo Alto to Skokie a few weeks ago and have pretty much settled my stuff into my parent's house as much as I can. It'll be hard adjusting to living in a place that technically isn't my own space, but I'll make do. It helps having my own room that I can retreat to and a closet I can organize the crap out of. Let me tell you, having shirts grouped together by sleeve length and arranged in rainbow order brings more joy to me than you can possibly imagine...
Although it's been a relatively smooth transition, that doesn't mean the move hasn't come with its fair share of contrasting emotions. Moving back home hasn't been that hard, but leaving the place I've called home for the past 6 1/2 years, along with all the friends I've made along the way, hasn't been easy. These past few weeks I've been excited, sad, frustrated, happy, angry, bored, overwhelmed, pensive, and challenged.
One thing that really helped though was getting back into the kitchen.
My younger cousin Arbela, who recently started a wedding and party planning company with her friend in Chicago, asked me to make a cake for a 21st birthday party she was throwing. And of course I had to do it! I was told that the Masquerade themed party was a formal event for ~100 people and the primary colors of the party were purple and gold. Other than that I was free to do whatever I wanted. SWEET!!! I love cake orders that give me lots of creative freedom.
And here's what I came up with (with a little help from the interwebs for ideas)

10", 8", 6" cakes with handmade mask and flower topper
There were two things I was most proud of with this cake:
(1) The mask topper.
Made of fondant (with tylose powder added, for all my cake decorating peeps in the know), I hand cut it and molded it using a knife and tissue paper. The flower was just a random thing I put together and not based upon a real (biological) flower. But I loved it anyways.

Could have technically worn this life-sized mask!
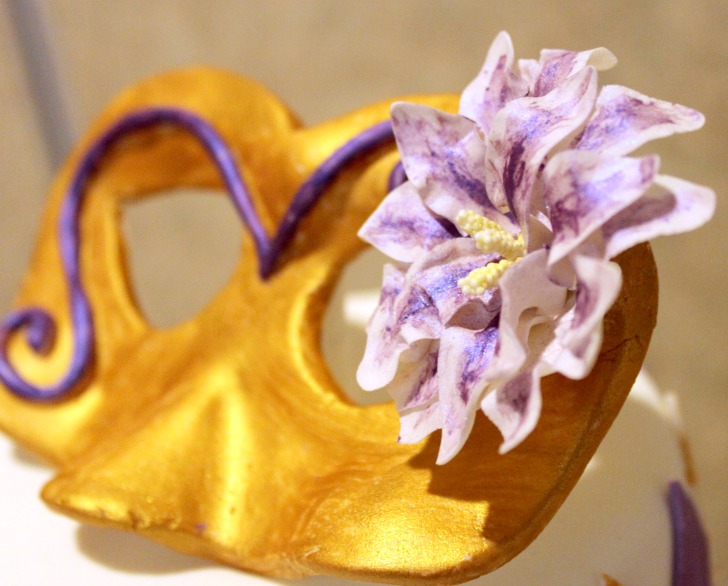
The only thing on the entire mask that wasn't made of fondant are the
three little stamen in the middle of the flower.
(2) I was also extremely happy with how clean my fondant work was this time. I didn't even need a border on the bottom layer. WHOOP!!

For those interested in the cake recipes, I split a single recipe of Guinness chocolate cake into two 6" and two 8" pans (that recipe makes so much batter that it fit the 4 pans PERFECTLY) and a recipe of yellow layer cake into the two 10" pans. Filling was the frosting I always make: Italian meringue buttercream. I can't believe I haven't blogged about the recipe yet, so I'll include that at the end of the post.
And because I like to give credit where credit is due (blame the scientist in me), here are the inspiration photos I used for the cake and the mask topper:
 |  |
But in the end, I definitely made it all my own!

Jacqueline
Italian meringue buttercream, adapted from The Whimsical Bakehouse
There are tons of recipes out there for Italian meringue buttercream, which basically involves beating egg whites to a hard peak, adding a boiling sugar water mixture heated to 248 degrees F, mixing until cool to the touch, and adding butter in at the end. I basically follow the same method but use reconstituted powdered egg whites instead of fresh egg whites. Because they're pasteurized, I don't have to worry about bringing the sugar water to the right temperature- I just boil it for a few minutes to heat it up.
If you want to go the traditional method using fresh eggs, you can follow the directions from this recipe. The say that the proper sugar temperature is required for the buttercream to "hold" itself properly. From my experience, when I use the powdered egg whites it really makes no difference if I boil the sugar water for 10 seconds or properly heat it up to 248˚F. I've never done a proper side by side comparison though, so if you're worried, feel free to bring the sugar water to 248˚.
Also, if you compare my recipe to other Italian meringue recipes out there you'll notice mine uses a much lower ratio of butter to egg whites. Personally I prefer it this way. Italian meringue buttercream is pretty buttery and I think my recipe yields a much lighter, less greasy frosting. But feel free to experiment and add up to 2 more sticks of butter to the recipe if you'd like.
Phew, that was a lot to say. Who knew a damn buttercream frosting could be so complicated!
Yield: 8 cups. That was enough frosting to fill and crumb coat my 3 cakes (6"/8"/10"), but not enough to frost them too. Feel free to cut this recipe in 1/2 or 1/4 if you want less. But do not increase-- it already fills up almost the entire 5 qt Kitchen Aid mixer!
Ingredients
1/2 cup water
2 1/4 cups sugar
reconstituted powdered egg whites, equivalent to 12 whites (For the brand I use, that's 1/2 cup powdered egg whites + 1 to 1 1/2 cups water)
1 1/2 pounds (6 sticks) unsalted butter at room temperature, cut into 1-inch pieces
Flavoring options:
nothing
-or-
1 tsp vanilla extract
-or-
1/2 tsp orange oil (I like this because I think it cuts a little bit of the butteryness from the frosting)
-or-
a few tsp instant coffee dissolved in 1 tsp hot water
-or-
a few ounces of your favorite liquor
-or-
melted chocolate (up to 1 cup?)
-or-
cocoa powder to taste
-or-
whatever you fancy
1. Combine water and sugar in medium sized pot and heat on medium. Do not stir or touch or do anything to the sugar to keep sugar crystal formation at a minimum. Just walk away and allow the heat to do all the work by bringing the mixture to a low boil. Boil for anywhere from 1-7 minutes. (Because we're using powdered egg whites, I don't think it really matters what temperature the sugar mixture is at.) While the sugar is heating up, prepare your egg whites...
2. Reconstitute your powdered egg whites according to the instructions on the container. Using a wire whisk, beat the eggs on medium high until they and firm and form hard peaks. Add a pinch of cream of tartar if you'd like, but it's not necessary.
Note: At this point, you've got to keep an eye both on your sugar mixture and your egg whites. In the ideal world your sugar will be a low boil for a few minutes (no more than 7ish) just as your egg whites are forming peaks. But watch out: you don't want to overheat the sugar (nothing past 248˚F) or overbeat the egg whites! If your sugar is boiling for 5-7 minutes and your egg whites are not done yet, lower the heat to keep the sugar at a simmer until the eggs are done.
This really isn't as hard as I'm making it sound, I promise...
3. When the egg whites are stiff, turn the mixer to low. Carefully transfer the boiling sugar water to a glass measuring cup and slowly add the sugar to the egg whites. I like to do this with the mixer going, making sure to avoid the wire whisk.
4. Once all the sugar has been added, keep the mixer running on low (or medium low) until the bowl is no longer hot and has reached room temperature. This usually takes ~20+ minutes for me.
Note: You could speed up the process by adding cold towels to the outside of the bowl, but I just let the machine go and start cleaning up the mess that is my kitchen at this point...
5. Once the egg whites are cool to the touch, you can start adding the butter 1-2 TBSP at a time. Allow to mix for a few seconds before adding the next TBSP of butter.
Note: you can use either the wire whip or paddle attachment when adding the butter. I like using the wire whip for a lighter, fluffier frosting. Use the paddle if you'd like to incorporate less air into your frosting.
6. Once all your butter has been added your frosting may look curdled or wet. DO NOT FREAK OUT!!! No, you did not mess up. This is 100% totally normal. All you have to do is KEEP BEATING THE FROSTING. That's it. Sometimes it takes a few minutes, sometimes it takes a lot more. Either way, it'll come together eventually. Just turn up the mixer to medium or medium high speed and let it do all the work. It'll magically go from a gloppy, wet mess to a perfectly luscious frosting in no time. I promise.
7. Add any extracts or flavorings that you want after the buttercream has come together. Enjoy!


LOVE this cake!!! Now that you're back here, Let's get together :)
ReplyDeleteBeautiful work as always, Jackie. We will miss you here in CA...enjoy your family and friends in Chicago, but treasure the memories of your California days!
ReplyDeletePatti Harrington
Once the butter has been added and the frosting goes flat, at what point is it considered a lost cause if it does not fluff up? 10 mins, 20 mins, 30 mins, etc?
ReplyDeleteHmmm, I've never had any issues with this frosting before. It usually only takes a handful of minutes with the mixer on medium high to high for it to go from a curdled, soupy mess to a nice frosting. Were the eggs still warm when you added the butter? (If so, that could have melted the butter instead of incorporated it properly) If so, try popping the frosting into the refrigerator and then rebeating it after a few minutes.
ReplyDelete