Baklava, with a surprise
It's the 27th, so you know what that means: another Daring Bakers post!
Through these challenges I've made desserts from all over the world using all kinds of crazy ingredients. But this month our challenge took me back to my Middle Eastern roots...


But the challenge wasn't making baklava. No, no, no- that would be wayyyy too easy. The challenge my friends, was first to make the phyllo dough entirely from scratch, then to make the baklava.

Through these challenges I've made desserts from all over the world using all kinds of crazy ingredients. But this month our challenge took me back to my Middle Eastern roots...

... with BAKLAVA!!!

I decided to make not just one, but two types of baklava.
But the challenge wasn't making baklava. No, no, no- that would be wayyyy too easy. The challenge my friends, was first to make the phyllo dough entirely from scratch, then to make the baklava.
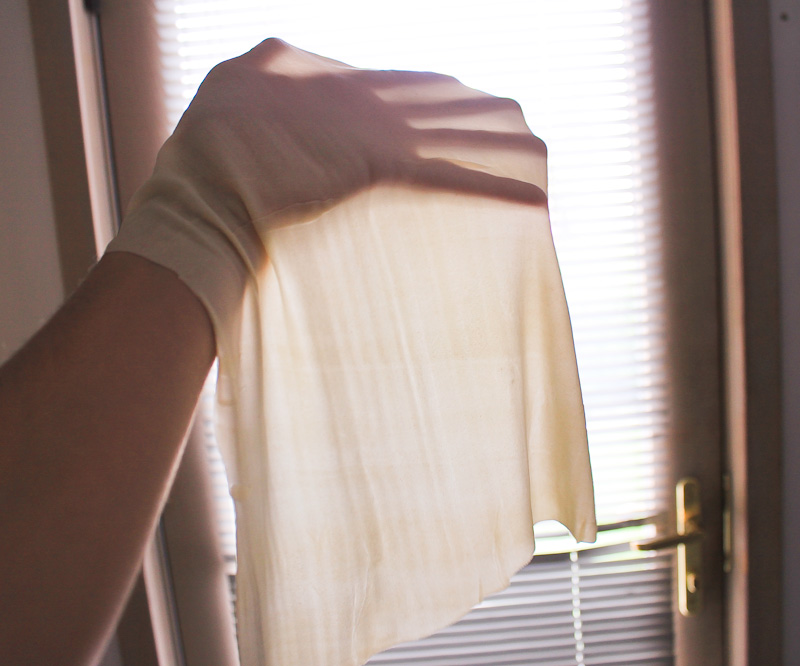
Individual sheets of phyllo dough, hand rolled to paper thinness.
Erica of Erica's Edibles was our host for the Daring Baker's June challenge.
Erica challenged us to be truly DARING by making homemade phyllo dough to make baklava
Erica of Erica's Edibles was our host for the Daring Baker's June challenge.
Erica challenged us to be truly DARING by making homemade phyllo dough to make baklava
Yes. You read that right.
I literally spent over an hour and a half rolling out 15 sheets of phyllo dough. Fun times! (And I was wondering why my shoulders are so sore today...)
Although the phyllo dough was actually a pleasure to work with, I don't think I'd go through all this effort again in the future. My mom told me that back home (in Iraq), my grandmother used to hire people to come out and make the dough whenever they made baklava!! So it's clearly a pain in the ass, but as a one-time cooking experiment, I couldn't be happier with the results.
As expected- the homemade phyllo dough is thicker and not quite as crunchy as purchased phyllo dough. My mom says that they're just different, with one not being "better" than the other. I still prefer the brittle and crispy texture of commercially made phyllo dough. So I'll definitely make baklava again, just probably not the dough.
BTW- baklava might seem like it's hard, but it was actually super super simple! Compared to making the phyllo dough, the assembly of the baklava came together in no time flat.
Ready to see how it all went down????
First things first: prepare yourself for a marathon day in the kitchen. This includes, but is not limited to:
* Wearing a cute apron (shout-out to my Nelson Lab ladies for this kick ass going away gift!)
* Posing for silly pictures with a 1/2" dowel that you'll use to roll out the dough
* Bumpin' to your music of choice
 |  |
Making Your Dough
The simple dough (recipes at the end of the post), is made up of flour, water, oil, and a teeny bit of vinegar, which apparently helps break down the gluten a bit, making it easier to roll the dough very thin.
Mix it, knead it, and let it rest.
Then let the rollin' begin! Grab a piece of dough slightly larger than a golf ball.

Mix it, knead it, and let it rest.
Then let the rollin' begin! Grab a piece of dough slightly larger than a golf ball.

On a well floured surface, roll the dough out using a regular rolling pin until it's larger than your hand. Feel free to go even larger than this.

Then using your 1/2" wooden dowel (got mine from Lowes for $1.50), work the dough until it is as thin as you can make it. You'll figure out the technique that works best for you, but just keep working the dough until you can't anymore. (My pieces of phyllo were ~ 12" x 12".) Hot tip: make sure to use a lot of flour, especially on the bottom of the dough.
At first it took me almost 5 minutes to roll each sheet out; by the end I got it down to less than 3 minutes!

Just make sure to put a piece of wax paper between each sheet of dough to keep them from sticking and cover loosely with a hand towel (dry and clean) to prevent the dough from drying out.

I wanted to try TWO different kinds of baklava. The first is an "open-faced" baklava, each individually comprised of square phyllo layers filled with barely-crushed pistachios.
Fold up the corners and squeeze to turn this....

.... into this:
It took some experimenting, but I think that 3" phyllo squares yielded perfectly sized baklava:

The second kind of baklava I made was the "typical kind", with layers and layers of phyllo + filling + more and more layers of phyllo.

Cut the baklava into diamonds, douse with a little more butter, and bake until golden brown.

I like my baklava with a lot more phyllo dough than nuts. And not too sweet. So for me, this baklava was PERFECT!!!
I have to re-do the recipe with commercial phyllo dough to optimize the number of sheets to use and the baking time. But until then, I'll share with you my notes and a recipe that I used from my Middle East Cookbook.
Well there you have it folks, my first batch of baklava made completely from scratch. And any Skokie/Chicago peeps that want a piece (ahem, Lloyd, ahem) are more than welcome to come by for a taste. :)
Yours in getting back to their roots through food,
Jacqueline
(Click below for the dough and baklava recipes.)
Before I give recipes, let me break down the basics of baklava for you:
1. Individual sheets of phyllo dough are brushed with lots of butter and stacked on top of each other.
2. A nut filling is included.
3. Baklava is cut (or it's already made in individual pieces) and baked until golden brown.
4. Meanwhile, you prepare a sugar syrup.
5. Immediately after the baklava comes out of the oven you spoon the sugar syrup allllll over it, which creates this insanely pleasant hissing sound as the warm syrup contacts the hot and flakey baklava.
Baklava, adapted from my moms recipe and that from the Middle East Cookbook
Note: Commercial phyllo dough dries out MUCH faster than the fresh kind. Make sure to always keep unbuttered dough covered with a hand towel and work as quickly as you can.
Ingredients
20 sheets phyllo pastry (or how many are found in a sleeve of phyllo)
3/4 cup butter, unsalted (1 1/2 sticks)
Nut filling:
6 oz. slivered almonds, finely chopped or sent through a quick wizz in the food processor (~1 1/2 cups)(you don't have to use slivered almonds, you can use blanched almonds (see here) or regular ones if you don't mind the skin)
2 TBSP sugar
1 1/2 to 2 tsp cardamom
1/4 tsp cinnamon
Note: The original recipe calls for 2 cups of finely chopped walnuts, 1 cup of finely chopped almonds, 1/4 cup sugar, 2 tsp cinnamon and 1/8 tsp ground cloves. So free free to (a) use as many/little nuts as you prefer and (b) to mix up the nuts you're using. Don't like almonds? Use all walnuts (more traditional anyways), or cashews or pistachios or macadamia nuts or hazelnuts or whatever!
Syrup:
1 1/2 cups sugar
1 1/2 cups water
2-3 TBSP honey
2 tsp lemon juice
thinly peeled strip of lemon rind, optional
small piece of cinnamon bark, optional
3 whole cloves, optional
Directions
Preheat oven to 325˚F
1. Melt your butter and use a spoon to remove/discard the top layer of white foam that develops on the butter.
2. Brush the bottom/sides of a 13 x 9" oven dish. (A light metal or glass dish is preferable as a darker pan might overbrown the baklava)
3. Layer nine sheets of phyllo in the pan, individually brushed with a healthy helping of butter.
4. Spread half of the nut mixture over the phyllo. Top with another two pieces of phyllo (brushing each with butter).
5. Spread remaining nuts on top and finish with remaining phyllo, brushing each sheet with butter.
6. Trim edges and brush top with remaining butter. Cut baklava with a sharp knife into diamond shapes.
7. Bake on center shelf for 30 minutes. Move up one shelf and cook for another 30 minutes. Loosely cover the baklava with foil if the top is getting brown too quickly.
8. While the baklava is baking, mix together the syrup ingredients. Heat over medium heat until sugar is dissolved. Bring to a low boil and cook for 15 minutes. Allow to cool and remove the cloves/cinnamon stick.
9. When the baklava is done baking, remove from the oven and immediately spoon the sugar syrup evenly over the hot baklava. (It'll make a great hissing sound as the warm syrup hits the hot dough.)
I haven't tried this recipe with commercial baklava, so I don't know if this amount of syrup is too much. So don't feel forced to add all the syrup if it seems too much. My syrup reached maybe halfway up the baklava or a little under, so use your tastebuds to guide your judgement. But I use much less honey than other recipes I've seen, so even with all this syrup it won't be sickeningly sweet, I promise!
10. Leave for several hours, or overnight, to allow the syrup to soak in.
Homemade phyllo dough, from Daring Bakers
Note: I doubled this recipe for my two batches of baklava.
Ingredients
1 1/3 cups (320 ml) (185 gm/6½ oz) unbleached all purpose (plain) flour
1/8 teaspoon (2/3 ml) (¾ gm) salt
1/2 cup less 1 tablespoon (105 ml) water, plus more if needed
2 tablespoons (30 ml) vegetable oil, plus additional for coating the dough
1/2 teaspoon (2½ ml) cider vinegar, (I used regular vinegar, but just under 1/2 tsp)
Directions
1. In the bowl of your stand mixer combine flour and salt and mix with paddle attachment.
2. Combine water, oil and vinegar in a measuring cup.
3. With the mixer running on low speed, slowly drizzle in the water and oil mixture until you get a soft dough.
Note: you may not use all the liquid (I didn't), or you may have to add a little more water (a tsp or two at a time). It'll all depend, so use your eyes to decide when you've added enough liquid, not your measuring cup.
This dough is too dry, so go ahead and add a little more water at a time until it looks like...

...this! You want the dough to stick together like this.

4. Once your dough is wet enough, change to the dough hook and let knead approximately 10 minutes. You will end up with beautiful smooth dough. If you are kneading by hand, knead approx. 20 minutes.
5. Remove the dough from mixer and continue to knead for 2 more minutes. Pick up the dough and through it down hard on the counter a few times during the kneading process. Go ahead, get out your aggressions!
6. Shape the dough into a ball and lightly cover with oil. Wrap tightly in plastic wrap and let rest 2 hours.
Rolling your Phyllo
** Remove all rings and jewelry so it does not snag the dough**
Use whatever means you have to get the dough as thin as you can. You may also use a pasta machine if you have one, or a normal rolling pin whatever works for you. A 1/2" dowel worked wonders for me, and it only costs a buck or two at a hardware store. You can also try this awesome technique (the traditional way to roll out the dough), but I found that my center was rolling a lot thinner than the outer edges. It definitely requires just the right touch that I apparently don't have...
1. Unwrap your dough and cut off a chunk slightly larger then a golf ball. While you are rolling be sure to keep the other dough covered so it doesn’t dry out.
2. Be sure to flour your hands, rolling pin and counter. As you roll you will need to keep adding, don’t worry, you can’t over-flour.
3. Roll out the dough with a large rolling pin to flatten it out. Get it as thin as you can.
4. When you get it as thin as you can with the rolling pin, I switched over to the wooden dowel to really stretch it out. NOTE: you will not get it as thin as the frozen phyllo dough you purchase at the store, it is made by machine
5. Set aside on a well-floured surface. Repeat the process until your dough is used up, making sure to use wax paper between each sheet. (If you don't, there's a good chance the earlier layers you made will stick together and you'll have to re-roll most your batch!) Make sure to cover your dough with a dry hand towel to prevent it from drying out.

Then using your 1/2" wooden dowel (got mine from Lowes for $1.50), work the dough until it is as thin as you can make it. You'll figure out the technique that works best for you, but just keep working the dough until you can't anymore. (My pieces of phyllo were ~ 12" x 12".) Hot tip: make sure to use a lot of flour, especially on the bottom of the dough.
At first it took me almost 5 minutes to roll each sheet out; by the end I got it down to less than 3 minutes!

Just make sure to put a piece of wax paper between each sheet of dough to keep them from sticking and cover loosely with a hand towel (dry and clean) to prevent the dough from drying out.
Making Your Baklava
Get your station ready for assembly.

p.s. I can't spell serrated... and I'm too lazy to fix it.
Fold up the corners and squeeze to turn this....

.... into this:
It took some experimenting, but I think that 3" phyllo squares yielded perfectly sized baklava:

The second kind of baklava I made was the "typical kind", with layers and layers of phyllo + filling + more and more layers of phyllo.

I decided to tear up the final sheet of phyllo on top for a "rustic" look.

I like my baklava with a lot more phyllo dough than nuts. And not too sweet. So for me, this baklava was PERFECT!!!
I have to re-do the recipe with commercial phyllo dough to optimize the number of sheets to use and the baking time. But until then, I'll share with you my notes and a recipe that I used from my Middle East Cookbook.
Well there you have it folks, my first batch of baklava made completely from scratch. And any Skokie/Chicago peeps that want a piece (ahem, Lloyd, ahem) are more than welcome to come by for a taste. :)
Yours in getting back to their roots through food,
Jacqueline
(Click below for the dough and baklava recipes.)
Before I give recipes, let me break down the basics of baklava for you:
1. Individual sheets of phyllo dough are brushed with lots of butter and stacked on top of each other.
2. A nut filling is included.
3. Baklava is cut (or it's already made in individual pieces) and baked until golden brown.
4. Meanwhile, you prepare a sugar syrup.
5. Immediately after the baklava comes out of the oven you spoon the sugar syrup allllll over it, which creates this insanely pleasant hissing sound as the warm syrup contacts the hot and flakey baklava.
Baklava, adapted from my moms recipe and that from the Middle East Cookbook
Note: Commercial phyllo dough dries out MUCH faster than the fresh kind. Make sure to always keep unbuttered dough covered with a hand towel and work as quickly as you can.
Ingredients
20 sheets phyllo pastry (or how many are found in a sleeve of phyllo)
3/4 cup butter, unsalted (1 1/2 sticks)
Nut filling:
6 oz. slivered almonds, finely chopped or sent through a quick wizz in the food processor (~1 1/2 cups)(you don't have to use slivered almonds, you can use blanched almonds (see here) or regular ones if you don't mind the skin)
2 TBSP sugar
1 1/2 to 2 tsp cardamom
1/4 tsp cinnamon
Note: The original recipe calls for 2 cups of finely chopped walnuts, 1 cup of finely chopped almonds, 1/4 cup sugar, 2 tsp cinnamon and 1/8 tsp ground cloves. So free free to (a) use as many/little nuts as you prefer and (b) to mix up the nuts you're using. Don't like almonds? Use all walnuts (more traditional anyways), or cashews or pistachios or macadamia nuts or hazelnuts or whatever!
Syrup:
1 1/2 cups sugar
1 1/2 cups water
2-3 TBSP honey
2 tsp lemon juice
thinly peeled strip of lemon rind, optional
small piece of cinnamon bark, optional
3 whole cloves, optional
Directions
Preheat oven to 325˚F
1. Melt your butter and use a spoon to remove/discard the top layer of white foam that develops on the butter.
2. Brush the bottom/sides of a 13 x 9" oven dish. (A light metal or glass dish is preferable as a darker pan might overbrown the baklava)
3. Layer nine sheets of phyllo in the pan, individually brushed with a healthy helping of butter.
4. Spread half of the nut mixture over the phyllo. Top with another two pieces of phyllo (brushing each with butter).
5. Spread remaining nuts on top and finish with remaining phyllo, brushing each sheet with butter.
6. Trim edges and brush top with remaining butter. Cut baklava with a sharp knife into diamond shapes.
7. Bake on center shelf for 30 minutes. Move up one shelf and cook for another 30 minutes. Loosely cover the baklava with foil if the top is getting brown too quickly.
8. While the baklava is baking, mix together the syrup ingredients. Heat over medium heat until sugar is dissolved. Bring to a low boil and cook for 15 minutes. Allow to cool and remove the cloves/cinnamon stick.
9. When the baklava is done baking, remove from the oven and immediately spoon the sugar syrup evenly over the hot baklava. (It'll make a great hissing sound as the warm syrup hits the hot dough.)
I haven't tried this recipe with commercial baklava, so I don't know if this amount of syrup is too much. So don't feel forced to add all the syrup if it seems too much. My syrup reached maybe halfway up the baklava or a little under, so use your tastebuds to guide your judgement. But I use much less honey than other recipes I've seen, so even with all this syrup it won't be sickeningly sweet, I promise!
10. Leave for several hours, or overnight, to allow the syrup to soak in.
Homemade phyllo dough, from Daring Bakers
Note: I doubled this recipe for my two batches of baklava.
Ingredients
1 1/3 cups (320 ml) (185 gm/6½ oz) unbleached all purpose (plain) flour
1/8 teaspoon (2/3 ml) (¾ gm) salt
1/2 cup less 1 tablespoon (105 ml) water, plus more if needed
2 tablespoons (30 ml) vegetable oil, plus additional for coating the dough
1/2 teaspoon (2½ ml) cider vinegar, (I used regular vinegar, but just under 1/2 tsp)
Directions
1. In the bowl of your stand mixer combine flour and salt and mix with paddle attachment.
2. Combine water, oil and vinegar in a measuring cup.
3. With the mixer running on low speed, slowly drizzle in the water and oil mixture until you get a soft dough.
Note: you may not use all the liquid (I didn't), or you may have to add a little more water (a tsp or two at a time). It'll all depend, so use your eyes to decide when you've added enough liquid, not your measuring cup.
This dough is too dry, so go ahead and add a little more water at a time until it looks like...

(picture from the Daring bakers challenge post)

(picture from the Daring bakers challenge post)
5. Remove the dough from mixer and continue to knead for 2 more minutes. Pick up the dough and through it down hard on the counter a few times during the kneading process. Go ahead, get out your aggressions!
6. Shape the dough into a ball and lightly cover with oil. Wrap tightly in plastic wrap and let rest 2 hours.
Rolling your Phyllo
** Remove all rings and jewelry so it does not snag the dough**
Use whatever means you have to get the dough as thin as you can. You may also use a pasta machine if you have one, or a normal rolling pin whatever works for you. A 1/2" dowel worked wonders for me, and it only costs a buck or two at a hardware store. You can also try this awesome technique (the traditional way to roll out the dough), but I found that my center was rolling a lot thinner than the outer edges. It definitely requires just the right touch that I apparently don't have...
1. Unwrap your dough and cut off a chunk slightly larger then a golf ball. While you are rolling be sure to keep the other dough covered so it doesn’t dry out.
2. Be sure to flour your hands, rolling pin and counter. As you roll you will need to keep adding, don’t worry, you can’t over-flour.
3. Roll out the dough with a large rolling pin to flatten it out. Get it as thin as you can.
4. When you get it as thin as you can with the rolling pin, I switched over to the wooden dowel to really stretch it out. NOTE: you will not get it as thin as the frozen phyllo dough you purchase at the store, it is made by machine
5. Set aside on a well-floured surface. Repeat the process until your dough is used up, making sure to use wax paper between each sheet. (If you don't, there's a good chance the earlier layers you made will stick together and you'll have to re-roll most your batch!) Make sure to cover your dough with a dry hand towel to prevent it from drying out.


Great write up!
ReplyDeleteWOAH. This sounds hella intense, yo. But certainly delicious.
ReplyDeleteAwesome post!! Love the pics. :)
Baklawa is originally an ancient Assyrian dessert. Back in the day it was made with a thicker dough. It wasn't until the Greeks got a hold of it that the crispy thin phyllo was introduced. It would be fun to experiment with a thicker roll out, probably even thicker than what you had.
ReplyDeleteLooks delicious, and yes with the store bought phyllo, baklawa is super easy to make.
I like your little square baklava parcels, and bravo for getting the phyllo so thin. You obviously have mad dowel-wielding skillz.
ReplyDeleteI absolutely love what you did with the phyllo, the final resilt looks so crispy and unique. Very fun to read your post :))
ReplyDeleteYour baklava looks fabulous! I especially like your individual little squares. So glad you enjoyed the challenge
ReplyDeleteSorry I missed this post (and more importantly, the shout out :-)), um I am 1000% interested in trying baklava next time you make it. As is Lukas, he told me.
ReplyDeleteI don't know if I have the patience to make them and I'm tired of the ones at Pita Inn.