Ruffle cake
Alright folks, here it is, the 2nd to last cake you'll see on the blog for who knows how long. Why 2nd to last? Well, a few reasons:
1. A few months ago I made 3 cakes in 4 weekends. It absolutely wore me out and since then the thought of decorating a cake was much more of a chore than a pleasure. If I'm going to make a cake, I want to make it on my own terms. Not something I have to make on a specific date. Chicago summers are too damn short and amazing to be spending an entire day cooped up inside with fondant.
2. It's a bagillion degrees here in Chicago. And I have yet to install my AC unit. So I'm not turning on my oven until it's fall.
3. This would have been my last cake. But I told a friend I'd decorate her son's b-day cake on 1 condition: she'd have to bake the cake. It should be a lot of fun (pirate themed party!), so I'm excited to see how it's gonna turn out. But after that: NO. MORE. CAKES. (until I say so)
This cake I made for a wedding shower and I'm SUPER sad I forgot my camera because it's one of the cutest cakes I've made. So I'm left with a semi crappy cell phone picture of the assembled cake.
Such simplicity. Such feminine elegance.Such a crappy photo.
Edit (02/24/2013): I found more photos of this cake on my computer, which are a little better than the ones I originally posted! So here you go:
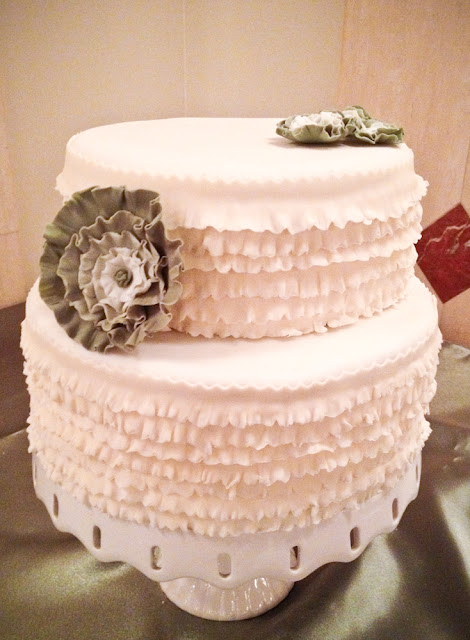
The cake itself took a little bit of time with all the ruffling, but it was an insanely easy cake to make. To make the flowers I just cut out circles, in various shades of sage (using my awesome Ateco cutters), and ruffled their edges using round toothpicks. (Check out this YouTube tutorial to see how I made my ruffles. The ruffle shape is accented if your fondant has a scalloped edge, but it works with a straight edge as well.)


The ruffled edges were made using the exact same toothpick technique- but on long strips of fondant. The only tricky part was moving fast enough so the fondant wouldn't dry out too much! That and working through the last few strips with a semi-raw finger.

It's a great technique that I'd love to try out on cupcakes or mini-cakes some day. But not for a while. :)
Yours in being *almost* done with cake decorating for the season,
Jacqueline
p.s. Here's the inspiration cake I used in making my cake above. I wish I had the original link but I just can't find it. What a difference a nice camera can make...

The cakes I made were (10") yellow cake with strawberry filling and (8") chocolate cake with raspberry chocolate ganache.
Recipes:
2 cups sugar
1-3/4 cups all-purpose flour
3/4 cup cocoa (I like Hershey's extra dark)
1-1/2 teaspoons baking powder
1-1/2 teaspoons baking soda
1 teaspoon salt
2 eggs
1 cup milk
1/2 cup vegetable oi
l2 teaspoons vanilla extract
1 cup boiling water (or coffee)
Directions
1. Heat oven to 350°F. Grease and flour two 9-inch round baking pans. (Or three 8" pans, or 1 bundt cake, or one 13"x9" pan, or 30 cupcakes)
2. Stir together sugar, flour, cocoa, baking powder, baking soda and salt in large bowl. Add eggs, milk, oil and vanilla; beat on medium speed of mixer 2 minutes.
3. Stir in boiling water (batter will be very thin; don't worry, this is normal). Pour batter into prepared pans.
4. Bake 30 to 35 minutes or until wooden pick inserted in center comes out clean. (Different baking times for different sized pans; 35-40 min for 13x9 pans, 30-35 min for 8" pans, 50-55 min for bundt cake, 22-25 min for cupcakes) Cool 10 minutes; remove from pans to wire racks. Cool completely.
Raspberry Chocolate Ganache, from a few sources, such as Bobby Flay
Note: this ganache is much softer than the kind typically used to make truffles. That's because it's used in the center of a cake, so I want it to have a softer mouth feel than a truffle ball when you bite into a slice of cake. You can still use the leftover ganache to make truffles (after refrigerating the ganache for at least a few hours) but they'll be a bit softer than normal.
Note 2: I'm pretty sure this is the final recipe I used, but I'm not 100% sure... whoops. It'll still be delicious, I promise.
Ingredients
1 lb dark chocolate, chopped
2 TBSP corn syrup
2 TBSP butter
1 1/4 cups heavy whipping cream
1 cup seedless raspberry jam
Directions
1. Place chopped chocolate in a heat-proof bowl and set aside. Heat cream, butter, and corn syrup just to a boil. Pour over chocolate and stir to combine. Stir in the raspberry jam.
2. The ganache is likely too soft to use right away. Allow to chill to at/below room temp or pop in the fridge for a bit to cool it down. Ganache can harden on you quite quickly, so make sure to check on it and stir it periodically. You want it hard enough to keep its shape and not spill out the sides of the cake but soft enough to spread. As always with cake fillings, make sure to use a frosting dam to prevent the ganache from pouring out the sides.
1. A few months ago I made 3 cakes in 4 weekends. It absolutely wore me out and since then the thought of decorating a cake was much more of a chore than a pleasure. If I'm going to make a cake, I want to make it on my own terms. Not something I have to make on a specific date. Chicago summers are too damn short and amazing to be spending an entire day cooped up inside with fondant.
2. It's a bagillion degrees here in Chicago. And I have yet to install my AC unit. So I'm not turning on my oven until it's fall.
3. This would have been my last cake. But I told a friend I'd decorate her son's b-day cake on 1 condition: she'd have to bake the cake. It should be a lot of fun (pirate themed party!), so I'm excited to see how it's gonna turn out. But after that: NO. MORE. CAKES. (until I say so)
This cake I made for a wedding shower and I'm SUPER sad I forgot my camera because it's one of the cutest cakes I've made. So I'm left with a semi crappy cell phone picture of the assembled cake.
Such simplicity. Such feminine elegance.
Edit (02/24/2013): I found more photos of this cake on my computer, which are a little better than the ones I originally posted! So here you go:

The ruffles are light ivory and the flowers are sage (to match her wedding colors)


Ombre!!
The ruffled edges were made using the exact same toothpick technique- but on long strips of fondant. The only tricky part was moving fast enough so the fondant wouldn't dry out too much! That and working through the last few strips with a semi-raw finger.

It's a great technique that I'd love to try out on cupcakes or mini-cakes some day. But not for a while. :)
Yours in being *almost* done with cake decorating for the season,
Jacqueline
p.s. Here's the inspiration cake I used in making my cake above. I wish I had the original link but I just can't find it. What a difference a nice camera can make...

The cakes I made were (10") yellow cake with strawberry filling and (8") chocolate cake with raspberry chocolate ganache.
Recipes:
- Yellow cake recipe is my standard one I use for cake decorating (although my absolute favorite yellow cake is still this Cooks Illustrated one).
- Strawberry filling was made using this recipe but swapping out frozen raspberries for strawberries.
- This Hershey's chocolate cake is my go-to for cake decorating, which I realized I've never blogged before! (recipe below) It doesn't taste quite as good as old-fashioned chocolate cake from Cooks Illustrated, but it's a semi-close second. And it takes NO time to throw together (literally almost as fast as making a box mix cake)
- And finally, a raspberry chocolate ganache (below), which I assembled from a few different recipes.
Tutorials:
- A great how-to for assembling/filling cakes. Jump to 2:30 to see how to use a frosting dam to keep fillings inside a cake and not leaking out the sides.
- How to make fondant ruffles
Hershey's "Perfectly Chocolate" Chocolate Cake, from Hershey's
Ingredients
1-3/4 cups all-purpose flour
3/4 cup cocoa (I like Hershey's extra dark)
1-1/2 teaspoons baking powder
1-1/2 teaspoons baking soda
1 teaspoon salt
2 eggs
1 cup milk
1/2 cup vegetable oi
l2 teaspoons vanilla extract
1 cup boiling water (or coffee)
Directions
1. Heat oven to 350°F. Grease and flour two 9-inch round baking pans. (Or three 8" pans, or 1 bundt cake, or one 13"x9" pan, or 30 cupcakes)
2. Stir together sugar, flour, cocoa, baking powder, baking soda and salt in large bowl. Add eggs, milk, oil and vanilla; beat on medium speed of mixer 2 minutes.
3. Stir in boiling water (batter will be very thin; don't worry, this is normal). Pour batter into prepared pans.
4. Bake 30 to 35 minutes or until wooden pick inserted in center comes out clean. (Different baking times for different sized pans; 35-40 min for 13x9 pans, 30-35 min for 8" pans, 50-55 min for bundt cake, 22-25 min for cupcakes) Cool 10 minutes; remove from pans to wire racks. Cool completely.
Raspberry Chocolate Ganache, from a few sources, such as Bobby Flay
Note: this ganache is much softer than the kind typically used to make truffles. That's because it's used in the center of a cake, so I want it to have a softer mouth feel than a truffle ball when you bite into a slice of cake. You can still use the leftover ganache to make truffles (after refrigerating the ganache for at least a few hours) but they'll be a bit softer than normal.
Note 2: I'm pretty sure this is the final recipe I used, but I'm not 100% sure... whoops. It'll still be delicious, I promise.
Ingredients
1 lb dark chocolate, chopped
2 TBSP corn syrup
2 TBSP butter
1 1/4 cups heavy whipping cream
1 cup seedless raspberry jam
Directions
1. Place chopped chocolate in a heat-proof bowl and set aside. Heat cream, butter, and corn syrup just to a boil. Pour over chocolate and stir to combine. Stir in the raspberry jam.
2. The ganache is likely too soft to use right away. Allow to chill to at/below room temp or pop in the fridge for a bit to cool it down. Ganache can harden on you quite quickly, so make sure to check on it and stir it periodically. You want it hard enough to keep its shape and not spill out the sides of the cake but soft enough to spread. As always with cake fillings, make sure to use a frosting dam to prevent the ganache from pouring out the sides.


Comments
Post a Comment